<?xml version="1.0" encoding="utf-8"?>
  <feed xmlns="http://www.w3.org/2005/Atom">
    <title>Co-Op Mode with Drew Conley</title>
    <link href="https://coopmode.dev/rss.xml" rel="self"/>
    <link href="https://coopmode.dev"/>
    <id>https://coopmode.dev/</id>
    <updated>2025-03-19T21:06:36.420Z</updated>
    <author>
      <name>Drew Conley</name>
    </author>
    <subtitle>Game development thoughts and articles</subtitle>
    <generator>JavaScript</generator>
    <entry>
        <title>Reaching 20,000 Subscribers on YouTube</title>
        <link href="https://coopmode.dev/articles/20k-on-youtube"/>
        <id>https://coopmode.dev/articles/20k-on-youtube/</id>
        <updated>2024-03-05T00:00:00.000Z</updated>
        <published>2024-03-05T00:00:00.000Z</published>
        <content type="html"><![CDATA[<p>It’s not a huge number by any stretch. I call <a href="https://youtube.com/c/drewconley" rel="nofollow">mine</a> a “small YouTube channel” whenever it comes up in conversation.</p>
<p>The subscriber metric itself is a little silly. Subscriber count doesn’t say much about your usual views or recent impact, but it’s a decent indicator badge saying: “you’ve helped <em>THIS</em> many people”.</p>
<p>Let me hit you with some things I’ve learned in my journey from 0 to 20,000 subscribers. If you’re considering starting (or dusting off) a channel on YouTube, I hope this post helps you out.</p>
<h2>First, the benefits of doing YouTube…</h2>
<p>YouTube has enabled me to:</p>
<ul><li>Start my own small business (you are looking at it!)</li>
<li>Create a bunch of career networking opportunities.</li>
<li>Meet lifelong friends around the world</li></ul>
<p>Despite being a pretty small channel, YouTube has been a huge net positive in my life.</p>
<p>It comes with a lot of stress, though. You’ve gotta invest a ton of side hustle time, you’ll deal with occasional rude comments, and battle <em>mega</em> imposter syndrome, but I’d say each video has been a compounding investment. Some of my earliest videos are still circulating and introducing me to amazing peers and friends.</p>
<p>The stressors make it easy to <em>not</em> show up, but generally every video has been worth making in the long term.</p>
<p>My channel started as a way of sharing technical things I learned from building <a href="https://store.steampowered.com/app/1064690/Danger_Crew" rel="nofollow">Danger Crew</a>. I was starting to work on a new game, too, so I thought putting some videos out throughout the process would be a good way to get the word out there about it. Somehow I keep gravitating back to making tutorial style videos.</p>
<h2>Getting started is the hardest part</h2>
<p>The first 1,000 subscribers are an absolute grind. You get practically ZERO views at first. In the early days, it helps to hustle a little bit for some external traffic. My first videos all featured public CodePen demos, so I’d link to the videos from those demos. I posted a few times on Dev.to. I think I tweeted every video I made, even though I hate tweeting. Those little moves add up when you are just getting started.</p>
<p>(I was in this period from 2019 to 2020. YouTube is way better at recommending videos to new viewers now. More on that in a bit.)</p>
<p>I felt on top of the world when I finally hit 1,000 subscribers. Now I could place ads! I felt like I was “in” and had unlocked a new avenue in my life. Like, what if this could grow to becomes the thing I <em>do</em> for work?</p>
<p>My interest in numbers faded pretty quickly as I was heads down making videos. It came back when I was close to 10,000 subscribers, which feels like a big milestone, but from 10,000 to 20,000 (took a little more than 1 year) I hardly even checked.</p>
<h2>Learning to keep at it</h2>
<p>The secret is consistency, but not the annoying “please-the-algorithm” kind of consistency. The tough truth is that making compelling videos takes practice. Everybody is terrible at it at first.
Thankfully, nobody cares too much. The viewers see it all the time.</p>
<p>The real secret to “keeping at it” and uploading consistently is <em>finding a niche that gives you energy</em>. If you get a rush from making the video, you have a massive advantage over all the other exhausted creators that are guided by chasing views. A friendly reminder to lean towards creating videos you are interested in making rather than ones that will supposedly perform well.</p>
<p>I <em>super</em> struggled with this in 2023. I was freshly laid off and desperately trying to make YouTube and Co-Op Mode work as my full time gig. Given the pressure, I kept trying to “crack the code” of making videos that appear to wider audiences. Not just videos for new game developers, but videos anybody who appreciates video games! Honestly they were all missing the mark. That kinda burned me out over time and now I need to find my personal video creation mojo again.</p>
<p>A cool thing about <em>this</em> site, Co-Op Mode, is that I can crank out anything I think that’s cool pretty quickly without even thinking about view counts. But then again, now I’m trying to do <em>both</em>. It’s a tricky balance.</p>
<p>Anyway, back to YouTube. For the record, publishing consistently <em>probably</em> is good from an algorithm perspective. It can’t hurt unless you are spamming low value uploads every day. YouTube’s <a href="https://www.youtube.com/@creatorinsider" rel="nofollow">Creator Insider channel</a> says upload frequency is not a factor. Your videos just need to be consistently good to keep viewers happy and build genuine trust.</p>
<p>I don’t have any hard data to prove this, but I do talk to a lot of peers in the space that all agree - times are ‘a changing. YouTube is getting better at serving the right video to the right person at the right time. That’s a good thing for new creators! I bet you’ve personally noticed videos with pretty small view counts appearing in your feed lately. View counts are lower, but quality of viewer is way higher. That’s the thing that counts!</p>
<p>Make a focused video that shares something useful or interesting, YouTube will find the audience FOR YOU. That is <em>incredible</em>. I find my love for the platform again when I remind myself of the basics.</p>
<h2>Comments</h2>
<p>I gotta admit, I didn’t want the comments. I think nasty jerks on the Internet stop a lot of people back from creating YouTube videos.</p>
<p>I mean, every video WILL get them, but you also mostly won’t. Assuming you genuinely put thought and effort into the video, most of your comments will be positive, encouraging, and thankful. Probably at least 99% in my experience.</p>
<p>That said, the internet is full of terribly sad and angry people that will take out their problems on you in the comment section. They bothered me at first, but I got used to them after awhile. YouTube has some great features for hiding users from your channel, so you can be instantly done with these people.</p>
<p>The comments that really sting usually have some truth to them. As an example, there are a couple of videos on my channel that I was in a rush to produce because I was trying to keep up a strict upload schedule. I mistakenly left a prettttty bad bug in the project code and didn’t realize it until I was a quite a few more videos into the code. At that point, it was difficult to undo without redoing a lot of videos. (YouTube doesn’t offer the ability to edit your existing videos).</p>
<p>Nasty comments about that bug still bother me, mostly because I know I let my quality slip there. Pinned comments and description edits can help mitigate past mistakes, but they aren’t perfect solutions. At some point, you have to accept your mistakes, forgive yourself, and learn for the future. Practice, practice, practice, right?</p>
<h2>Gear doesn’t matter so much.</h2>
<p>Friends occasionally ask what kind of recording setup I use. I admit I <em>like</em> tech things, so I’m always tempted to buy new cameras, lights, toys etc. Honestly, very few of those purchases really helped anything.</p>
<p>The one thing any video creator <em>does</em> need is a decent microphone. Bad audio will tank any video, no matter how great the message is. If you want to get into this stuff, just order a Logitech Blue Yeti on Amazon and be on your way.</p>
<p>Good software helps, but isn’t required. Admittedly, picking up <a href="https://www.telestream.net/screenflow/overview.htm" rel="nofollow">ScreenFlow</a> (editing software) was a personal game changer for my workflow, but honestly some of my most successful videos were just me recording and chopping with OBS, which is free. Anything that can splice up some clips is fine to get started.</p>
<p>Graphic design wise, the agony of titles and thumbnails is so annoying. Mine are terrible. It’s a skill to work on, but ultimately shouldn’t stop anyone from uploading.</p>
<h2>Watching out for bad advice</h2>
<p>Last year, in that pursuit of big views, I followed a lot of bad advice from people saying “try this with your thumbnail” or “clickify your title”. It’s hard to truly A/B test these changes, so I don’t know if they were net positive or not, but I do know that the advice versions didn’t feel like me. I’m still embarrassed about them. I think 4-year-ago-me who was just starting would watch the videos and be like “dude, who are you?”</p>
<h2>My successful videos</h2>
<p>I mean, what is “success” really? The YouTube platform unapologetically wants you to know that success = views. YouTube Studio straight up celebrates when you upload a hit and shames you when your latest video flops. Here are the ones that did my heavy lifting from 0 to 20k:</p>
<p><a href="https://youtu.be/nHaiLWUaWWw" rel="nofollow">Danger Crew Presentation</a></p>
<p>I had prepared this talk for a remote JavaScript meetup. I put the work into the slides and flow and all that, so why not record it real quick for YouTube? I’m glad I did.</p>
<p><a href="https://youtu.be/fyi4vfbKEeo" rel="nofollow">Pizza Legends First Video</a></p>
<p>This video is the front door to arguably the thing most people know my channel for. Any reference to Pizza Legends points you to this first video. It took me a couple months to prep the codebase for this series, and it taught me a lot about how to manage recording a video project of this size. I’ve refined my process a lot for video series here on Co-Op Mode, mostly shaped by mistakes and pain points I made during the recording of Pizza Legends.</p>
<p>I’ll always look back fondly on the night this first video was uploaded. It was the beginning of a wildly stressful but pivotal ride in my life.</p>
<p><a href="https://youtu.be/xhURh2RDzzg" rel="nofollow">Firebase Tutorial</a></p>
<p>I did this in one weekend. I wrote the initial code at a brewery on a Friday night. I recorded the codealong on the next day, spending some decent time on the intro. I edited the whole video on one Sunday and quickly threw together a thumbnail. I didn’t think much of it at the time, but it surprisingly did well.</p>
<h2>Again, it’s probably worth doing</h2>
<p>If you’ve been on the fence about clicking “Upload”, you should just try it. And let me know you did.</p>]]></content>
      </entry>
    <entry>
        <title>Planning video game projects so you actually finish them</title>
        <link href="https://coopmode.dev/articles/design-document-boards"/>
        <id>https://coopmode.dev/articles/design-document-boards/</id>
        <updated>2024-01-11T00:00:00.000Z</updated>
        <published>2024-01-11T00:00:00.000Z</published>
        <content type="html"><![CDATA[<p>Let’s face it - games are <em>long</em> projects. Even a small scoped solo-dev game may take months, even years, to develop. When we’re in the thick of building, we are at constant risk of “losing the forest for the trees”, getting overwhelmed by everything left to do, and eventually quitting. Especially if you’ve had your eye on a different project idea.</p>
<p>Creating a <strong>design document board</strong> is a good way to mitigate shiny object syndrome, that feeling of wanting to switch to yet another new gamedev project.</p>
<p>Design documents can help keep you grounded, motivated, and focused on the very next thing to implement in your project. A detailed plan will take the agony out of deciding what to do next and free you up to just <em>sit down and code the game</em>.</p>
<p>Making these document boards has been a game changer for my personal process. Let’s talk a little bit about helpful things that can go into these documents.</p>
<p>Real quick, here’s a video version of this post:</p>
<iframe width="560" height="315" src="https://www.youtube.com/embed/YdKPCFlFbOA?si=gFVwMHYa2yDyXi8S" title="YouTube video player" frameborder="0" allow="accelerometer; autoplay; clipboard-write; encrypted-media; gyroscope; picture-in-picture; web-share" allowfullscreen></iframe>
<p>(I walk through some of my actual project documents in the video.)</p>
<h2>Ideation</h2>
<p>These days, I have been reaching for <a href="https://figma.com" rel="nofollow">Figma</a> for organizing and brainstorming my game ideas.
Figma is perhaps best known as a design application for creating and collaborating on app mockups, but it can <em>also</em> be used as an infinite whiteboard.</p>
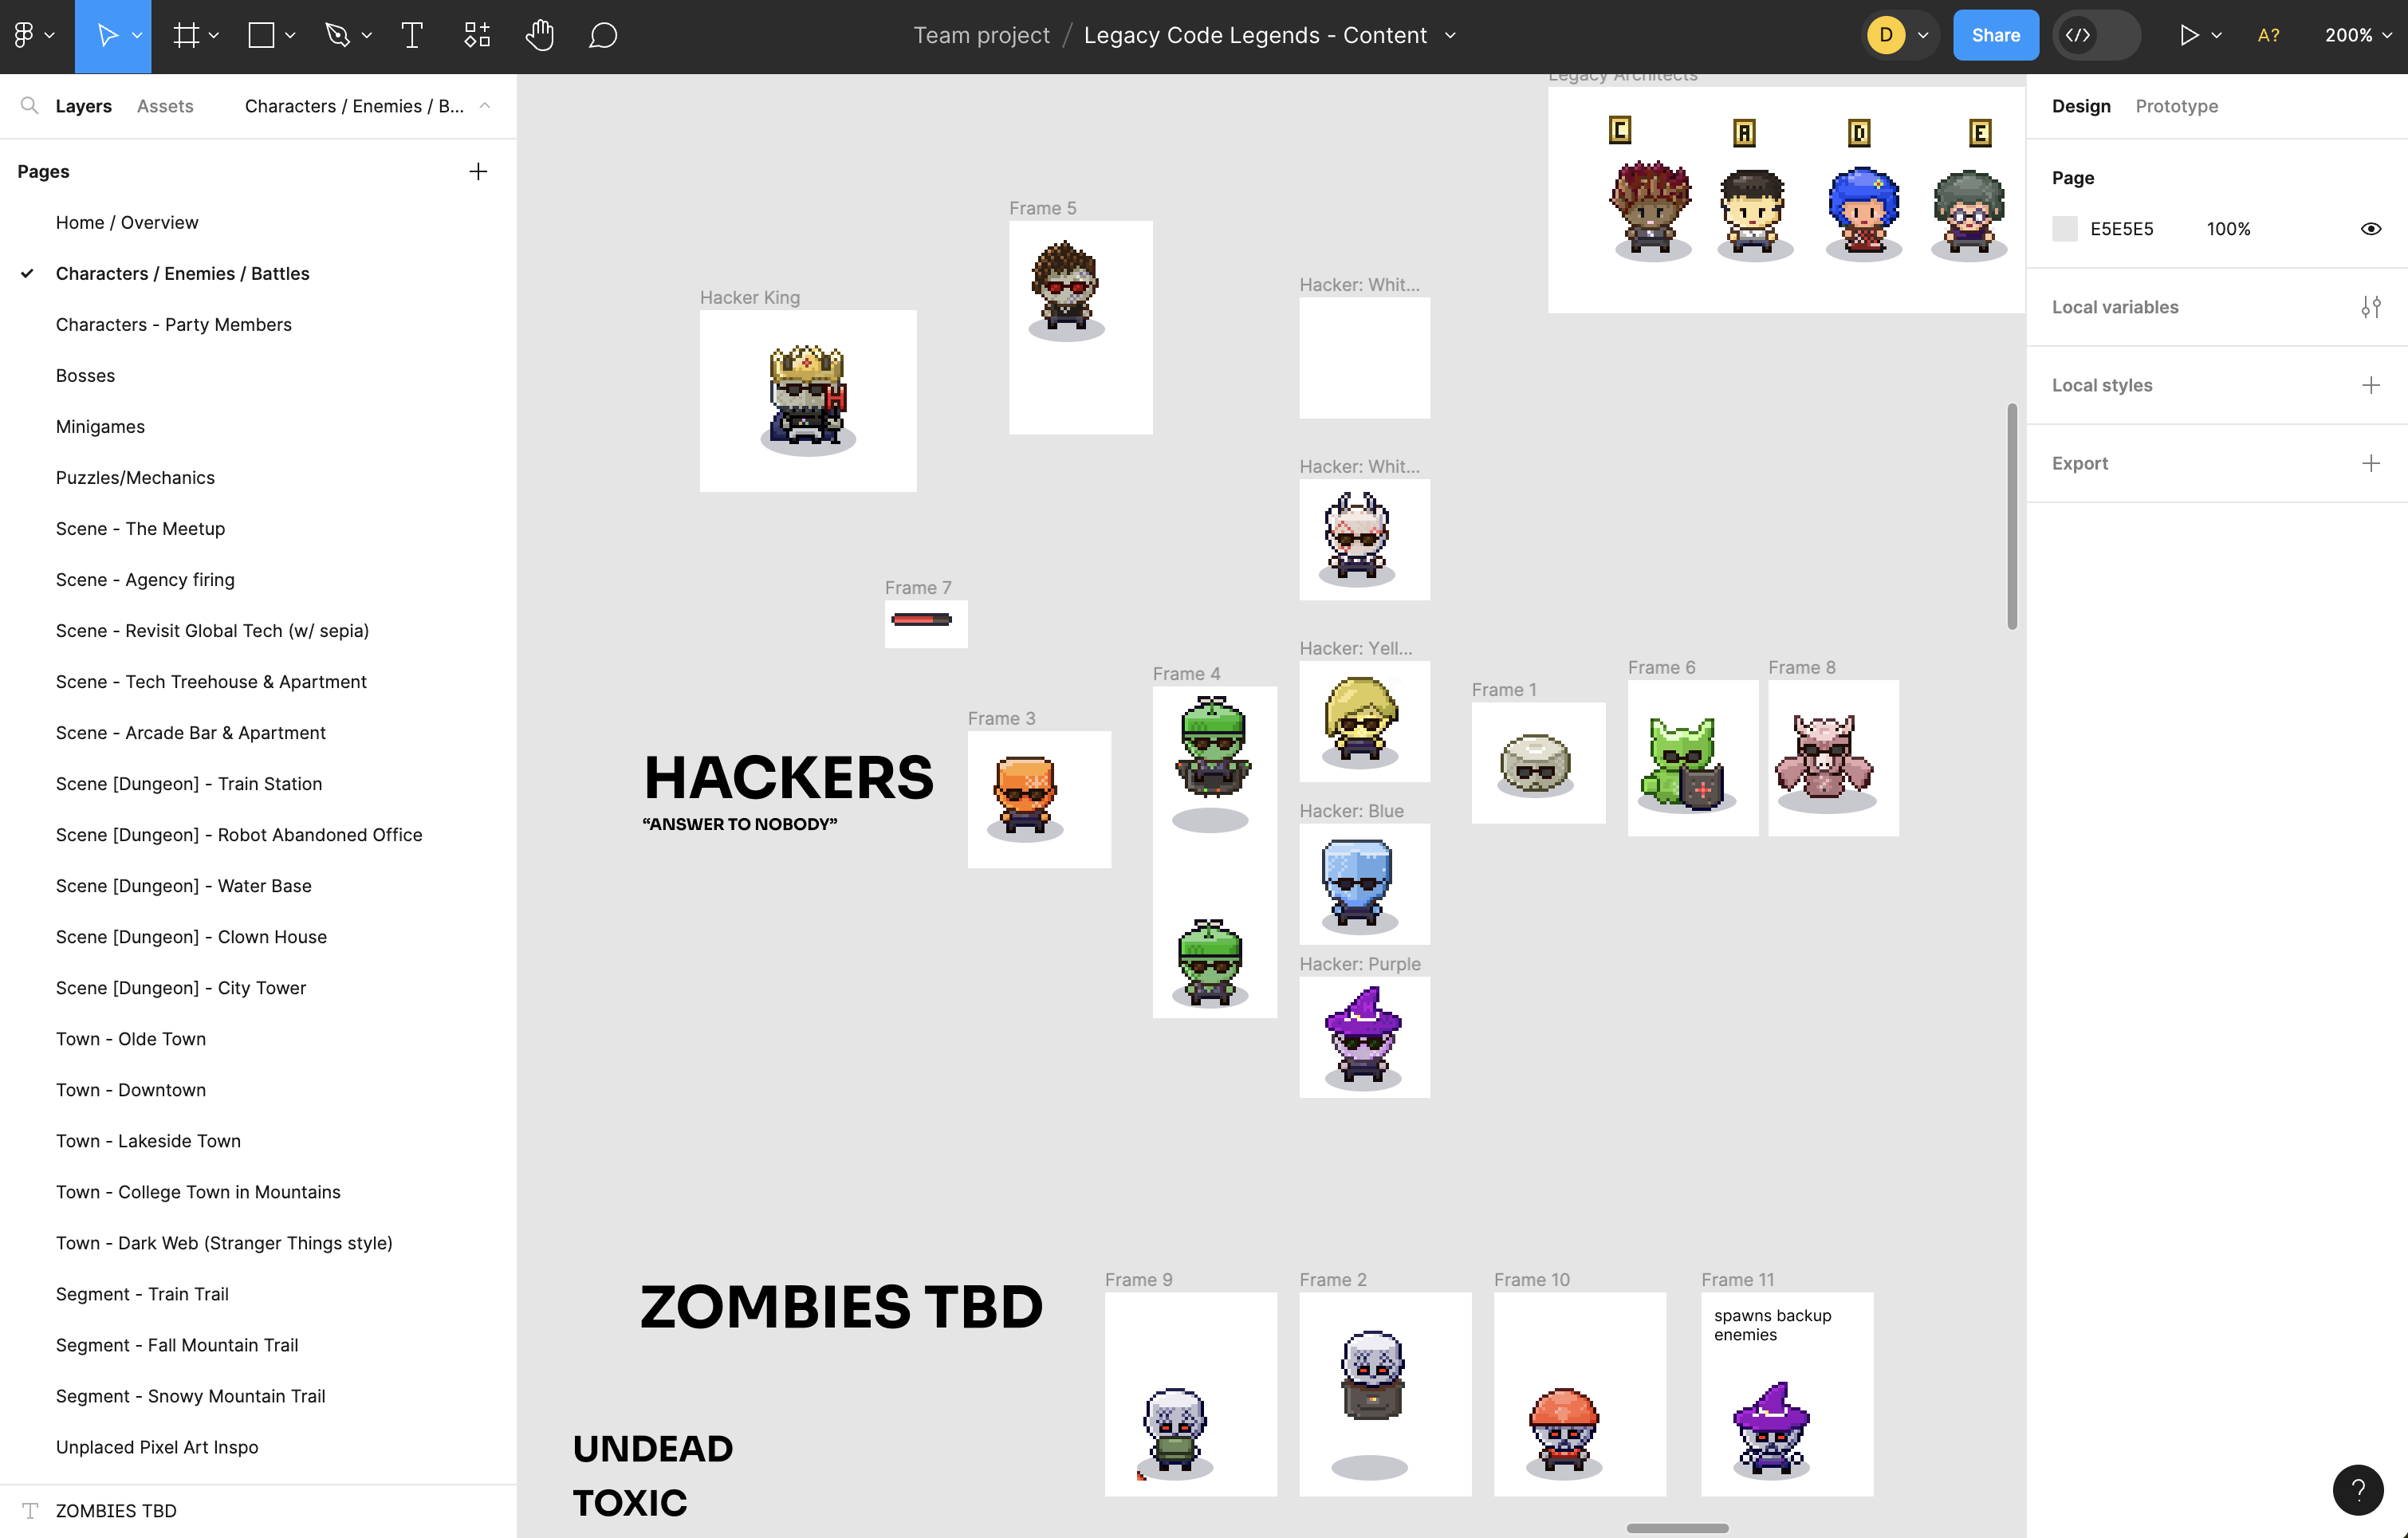
<p>Here’s of an example of an Enemy Idea Board from an upcoming project of mine. Anytime I have an enemy idea, I’ll add a character mockup to the board.</p>
<img src="https://res.cloudinary.com/dzfwb0xu5/image/upload/v1704986298/courses.drewconley.dev/images-for-articles/2024/Figma-example_wbxccj.png" alt="An example of an idea board in Figma">
<p>You don’t need game art right away. On day one, I’ll start opening art boards and filling them only with raw bits of text. These are very free-form, where I gather any little snippet of idea. “Jerk rival”, “angry fish”, “joke about tacos”, etc.</p>
<p>For example, if I know my game should have a main town, I’ll make a large art board for the town design and pump it full of ideas of events you may encounter in the town. They start as small seeds, then grow into full ideas over time.</p>
<p>Figma allows media imports, so my next step is to add additional images alongside the text snippets.  I’ll sketch cheap mockups and characters doodles in a physical notebook, then snap a photo using my phone camera and import into Figma. This capability is especially handy when you are away from a computer but feeling inspired and want to capture ideas for your game. Figma can be used on your phone, too, so ideas can be captured from anywhere. (I swear this post is not a plug for Figma.)</p>
<p>I remember designing a full chapter of Danger Crew on a handful of coffee shop napkins one day on a lunch break.  I took photos of each napkin, laid them all out in connections, and eventually made pixel art equivalents for each napkin slice. The final maps in the game turned out shockingly similar to the napkin versions.</p>
<h2>Asset Generation</h2>
<p>The next phase is to produce real game assets for each sketch. For me, this usually means going to town in Aseprite, my pixel art editor of choice. I’ll make close-enough pixel art versions of the doodle ideas and drop those in the same art boards alongside the original sketches.</p>
<p>These don’t need to be final assets, they are simply placeholders that associate progress to each character or section of the game. All of the rough sketches and text notes act as a checklist - you can immediately see at a high level which pieces have art ready and which still need some designing.</p>
<p>For the record, if you are using pre-made art, you can gather those assets from a resource like Itch or Kenney and plop them in your art boards. Anything to designate “this is the graphic I want to use for this entity”.</p>
<p>Once most sketches have real game assets associated, the whole collection will start to feel like the cast of your whole game!</p>
<h2>Code Design</h2>
<p>One of the biggest value adds of a design document is the ability to see your feature ideas at a high level. The bird’s eye view can help inform the way you approach code.</p>
<p>For example, when planning out an RPG game, you might have all of the game’s attacks, stats, and abilities on the whiteboard. Or, you know, at least as many as you have thought of so far.  The basic attacks are easy, right? 10 attack damage… done! No problem.</p>
<p>But, as soon as you want a special attack that does damage AND heals AND causes another side effect AND schedules a different kind of side effect to happen later… well, all that stuff can be tricky to layer in later. It may be beneficial to have an idea of types of requirements <em>before</em> you start coding up the RPG system. At least as best you can.</p>
<p>Flexibile and extensible code is always something to strive for, because we’ll never 100% of the requirements up front, but planning as many features as possible before coding them may smooth out the whole game development process. </p>
<h2>Pick just one thing</h2>
<p>After building out your design document a bit, you’ll have a clear picture of everything you <em>want</em> to include in the game, and also an understanding of everything you haven’t gotten to yet.</p>
<p>Feeling stuck or unmotivated? Pick just ONE outstanding task in the doc and build it. Repeat this process over and over, and unexpectedly soon your game will be ready to go.</p>]]></content>
      </entry>
    <entry>
        <title>Embracing the Retry Loop with Gravity Circuit</title>
        <link href="https://coopmode.dev/articles/gravity-circuit-retry-loop"/>
        <id>https://coopmode.dev/articles/gravity-circuit-retry-loop/</id>
        <updated>2024-01-05T00:00:00.000Z</updated>
        <published>2024-01-05T00:00:00.000Z</published>
        <content type="html"><![CDATA[<p>There’s a certain rush that difficult games have in the “30 seconds of fun” loop, and I think <a href="https://store.steampowered.com/app/858710/Gravity_Circuit/" target="_blank">Gravity Circuit</a> nails it.</p>
<img style="display:block" src="https://res.cloudinary.com/dzfwb0xu5/image/upload/v1704137521/courses.drewconley.dev/images-for-articles/2024/GravityCircuit-SteamHeader_x8xryq.jpg" alt="Gravity Circuit">
<p>Gravity Circuit is an unapologetic Mega Man X-like game. Fast pacing, SNES-like pixel art, precise wall jump mechanics. I grew up a huge Mega Man fan, so this game was right at home for me. While clearly an homage to the classic games, Gravity Circuit brings its own voice and modern features to the genre.</p>
<p>I’m here to talk about the game’s difficulty. <em>It’s very freakin’ hard</em> at first… at least it was for me.</p>
<p>The stages are full of dangerous enemies, traps, and tricky acrobatic jumps. The enemies especially have tightly tuned “under your skin” placements and projectile patterns. They have a knack for always being in or shooting towards your natural movement trajectory. Health restoration items are rare, too, so you better not be taking much damage. I had to retry sections over and over again, memorizing the placements of each threat before surviving to the next section.</p>
<p>And then there’s the bosses. Each boss has multiple strikes that practically fill the entire screen with dangerous blasts or projectiles. I lost count, but I probably died upwards of fifty times per encounter. The bosses were immune to any of the equipped power-ups I tried. They have way more health than you, too. (You can find health upgrades, though, to even the score.) There are no shortcuts… you have to learn their patterns, which are fast and difficult, and try, try, try again until you victoriously trigger their robot bodies to explode.</p>
<p>In contrast to Mega Man games, Mega Man could power through any difficult boss by simply acquiring and blasting them with their appropriate weakness. Mega Man’s advantage moves are typically so effective that you hardly need to learn the boss dodging or projectile patterns. If you have the right ability, you are in good shape. Unless I missed it, Gravity Circuit bosses don’t care about your abilities. </p>
<p><em>Edit: On reviewing the speed runs (linked below) it does look like you can chain some super moves together to pummel the bosses. I had no idea!</em></p>
<p>It’s a difficult game, but it feels so GOOD to play. Each enemy blast, dashing wall jump, grapple shot, and successful super-charged strike is a polished dopamine hit. Enemies explode into little pickups, too, which zip over to your location and give you an “aw yeah” kind of warm collecting feel.</p>
<p>The stages are lengthy but broken into digestible checkpoints. There are no lives or Game Overs, just infinite retries of the checkpoint segments. Each boss has a checkpoint right before the showdown, too, so you won’t need to redo the stage a billion times between the bosses crushing you. Because the checkpoints are fairly common, the game never asks too much of a time commitment from you. Each section can realistically be completed in a minute or two (you’ll be retrying those couple minutes a lot, though).</p>
<p>While dying is very common, there’s almost no downside. You just get up and try again, getting a little bit better with every attempt. It feels a bit like drilling through a solid wall - the encounters feel impossible at first, but every attempt goes a little bit better. Eventually, you’ll persevere through the section and feel like a champion.</p>
<p>There’s nothing particularly <em>new</em> here, by the way. Retrying until you win has been part of gaming forever. Gravity Circuit is just designed in a way to unapologetically kill you a lot and encourage you to try again without making you feel too terrible about it. The tight gameplay feels so good that taking yet-another-stab at a tricky session is mildly addicting.</p>
<p>Being honest, I don’t think I would have stuck with the game if I was warped back to the beginning of the stage after every death - the cost would just be too high for my attention span. Even slow loading times between retrying difficult sections can make players bounce. Gravity Circuit is snappy every step of the way.</p>
<p><em>Update: I am playing through Mega Man 11 now and instantly hate how it has the lives system. The cost of dying is very expensive. But, I guess that’s part of the fun. I like how Gravity Circuit handles it better.</em></p>
<p>When designing a game, it’s easy to get caught up in the balance of Fun vs Difficult. Gamers love a good challenge, but too difficult can be alienating. Yet, too easy often means no fun. I like that Gravity Circuit is fine with being very difficult and just designs the costs away in the form of a satisfying and quick Retry.</p>
<p>(Arguably, Gravity Circuit is maybe closer to the Game Boy Advance Mega Man Zero than Mega Man X, which were very difficult games. Despite constantly dying and retrying sections, I loved every minute of it.)</p>
<p>Highly recommended for platformer fans.</p>
<p>Here’s some speed run footage to get a feel for the game:
<a href="https://www.youtube.com/watch?v=Qbgeb6TBJTw&t=1129s" rel="nofollow">https://www.youtube.com/watch?v=Qbgeb6TBJTw&amp;t=1129s</a></p>
<a href="https://store.steampowered.com/app/858710/Gravity_Circuit/" target="_blank">Buy Gravity Circuit on Steam</a>.
<p>I played on <a href="https://www.nintendo.com/us/store/products/gravity-circuit-switch" target="_blank">Nintendo Switch</a>.</p>]]></content>
      </entry>
    <entry>
        <title>Thank you, 2023. Welcome, 2024!</title>
        <link href="https://coopmode.dev/articles/thank-you-2023"/>
        <id>https://coopmode.dev/articles/thank-you-2023/</id>
        <updated>2024-01-01T00:00:00.000Z</updated>
        <published>2024-01-01T00:00:00.000Z</published>
        <content type="html"><![CDATA[<p>2023 was wild. A few big changes in my life triggered me to finally launch this site, Co-Op Mode.  I had been riffing and sketching versions of it for YEARS, pretty much ever since I started creating YouTube videos, but never had the time or flexibility to make it happen.</p>
<p>Real quick, if you prefer video, here’s a video version of this post on my YouTube channel.</p>
<div style="margin-bottom:2rem"><iframe width="560" height="315" src="https://www.youtube.com/embed/bn6DXKVbcUg?si=3W2tx3OMEyW6sXV6" title="YouTube video player" frameborder="0" allow="accelerometer; autoplay; clipboard-write; encrypted-media; gyroscope; picture-in-picture; web-share" allowfullscreen></iframe></div>
<p>My previous job was so busy that I didn’t have time or mental energy to create much. The big kicker for me was getting laid off in Q1 2023. It was a rough time when so many software engineers were losing jobs and flooding the job market. Instead of immediately returning to the job interview hustle, I shifted my focus to making game development videos. I wanted a proper home for the videos where I could control the tone and feel of the experience rather than hosting on a site like Udemy or similar, so here we are!</p>
<h2>Pressing “Record”.</h2>
<p>Co-Op Mode has six full video series on it, all released from April 2023 to December 2023.</p>
<p><a href="https://www.coopmode.dev/series/ciabattas-revenge" rel="nofollow">Ciabatta’s Revenge</a> - where we build an action puzzle game in React JS. (Here’s the full game demo on Itch)</p>
<p><a href="https://www.coopmode.dev/series/pizza-legends-godot" rel="nofollow">Pizza Legends Godot</a> - where we build a top-down RPG Overworld system in Godot version 4. I was very excited with this one to explore Godot’s latest offerings.</p>
<p><a href="https://www.coopmode.dev/series/action-multiplayer" rel="nofollow">Action Multiplayer</a> - where we build a Link’s Awakening style demo with Excalibur.js and Peer JS, but with online multiplayer!</p>
<p><a href="https://www.coopmode.dev/series/canvas-rpg-kit" rel="nofollow">Canvas RPG Kit</a> is all about creating a lightweight HTML Canvas-based game engine that can power top-down RPGs. We explore many abstractions and semi-advanced techniques with HTML Canvas.</p>
<p><a href="https://www.coopmode.dev/series/front-end-interview-bootcamp" rel="nofollow">Front End Interview Bootcamp</a> is an in-depth guide to many concepts and challenges you may face when interviewing for a Front End Engineer role. Everything from technical coding prompts to behavioral questions. I based this on my own experiences hitting the job market again.</p>
<p><a href="https://www.coopmode.dev/series/nextjs-level-editor" rel="nofollow">Next.js Level Editor</a> is a journey in making a Next.js based content editor for an RPG game. It’s based loosely around the Canvas RPG Kit series, but it can be modified to match the needs of your game. I’m big on making custom tools for game dev projects, so this one was a long time coming!</p>
<p>That’s something like 120 videos on Co-Op Mode Premium. </p>
<hr>
<h2>On to 2024!</h2>
<p>As we kick off the New Year, I want to say THANK YOU to everybody who has been supportive and encouraging through the launch of the site. I don’t expose too much of my personal life on here, but 2023 had some very difficult stretches. The support I received from you all really kept me going, so thank you again.</p>
<p>I mention it in the video, but I’m a Dad now, too. My wife and I welcomed our first baby in November. He’s amazing. Having a kid kind of forces you to stop and think about every detail in your life. You become hyper aware of where every little morsel of time goes. That’s had a big impact on my plans for this year.</p>
<p>While 2023 was full of expanding in content reach, I am planning 2024 to focus on growth and depth. More free content and articles. Probably fewer big new series, but augmenting the existing ones with more depth and perspective. I also have some giant game dev projects in the works myself, which I’d like to open the hood on in a new series. That’s the stuff that really energizes me!</p>
<p>I wish you the best in 2024. Let’s do this!</p>]]></content>
      </entry>
    <entry>
        <title>Choosing JavaScript Or Godot For Your Next Project</title>
        <link href="https://coopmode.dev/articles/javascript-or-godot"/>
        <id>https://coopmode.dev/articles/javascript-or-godot/</id>
        <updated>2023-12-20T00:00:00.000Z</updated>
        <published>2023-12-20T00:00:00.000Z</published>
        <content type="html"><![CDATA[<p>Occasionally, I’ll receive this question in Discord or YouTube comments: </p>
<blockquote><p>What do you prefer when developing a new game: Godot or JavaScript?</p></blockquote>
<p>For context, my video viewers mostly know me as a guy who has been making games with JavaScript over the years. When I started creating videos about developing with Godot, some assumed that I’ve “switched teams” or had some kind of falling out with JavaScript. That’s not the case at all - Godot is simply another tool in my toolbox, and I’m happily balancing both.</p>
<p>I don’t have a clear answer or favorite. The truth is I love using both JavaScript and Godot for game development these days and reach for them at different times for different reasons.</p>
<p>Before we get into it, here’s a quick spoiler of my conclusion: if you are not sure which way you need to go, you can’t choose wrong. Players of your game won’t know or care how your game was made, they just want to play a fun, high quality game.</p>
<p>With that in mind, as developers, we should be in tune our own needs and interests to persist through deserts of a long gamedev projects. We are humans facing an uphill challenge of shipping <em>large</em> games. We’re at constant risk of Shiny Object Syndrome, so we need to choose tools and technologies that will age well and be a good companion through the entire journey of finishing a game. Maybe in other words, the right question to answer is “which stack will I actually finish this game with?”</p>
<p>So, how do you decide between the two? Let’s dive through about a pro/con list. These are just thoughts and nuances I’ve noted in my own experience.</p>
<h2>Benefits of authoring in JavaScript</h2>
<ul><li><strong>Full time web developers/JavaScript-slingers will be right at home</strong> when writing code in the language of JavaScript. No need to balance multiple programming languages in your brain.</li>
<li><strong>Use your own tools.</strong> I am silly fast with JetBrains WebStorm IDE, for example. I have snippets, shortcuts, and workflows that save me loads of time. The productivity flow keeps me going, and it’s typically easier for me to jump back into a project that has been stagnant for a few months. Your favorite web browser also counts as a tool, by the way, where you’ll spend a lot of time testing and debugging your work.</li>
<li><strong>Text as the source</strong>. In a JavaScript/web repo, you’re usually working with a bunch of text files in a directory. Rather than full-blown GUI applications with inspector windows and things getting lost/maybe accidentally changed, every change you make happens by editing code. As a caveat, perhaps you’ve created an Editor tool to help you generate code or content… in that case, you’re probably leveraging the tool to automate some code authoring you previously were doing manually.</li>
<li><strong>Quick and easy URL sharing</strong>. While engines often have HTML5 Export, there’s nothing quite as fluid as pushing your work up to Vercel or Netlify and sharing a preview link with somebody, or plopping your work in a quick CodePen demo. There are probably ways to make it better, but I’ve found sharing Godot projects to be a bit awkward if you just want to send somebody a “play this real quick” kind of link. This is also a huge pro for Game Jams and situations where you want your game to conveniently be played right in a browser.</li>
<li><strong>Mobile support by default</strong>. If your game runs in a browser, a bit of Responsive Web Design will enable you to serve both Mobile and Desktop users with a few styling moves. Granted, you need to put thought and effort into the experience of each platform (the user input may be wildly different), but the technical side is available by default.</li></ul>
<h2>Drawbacks of authoring in JavaScript</h2>
<ul><li><strong>Everything is manual.</strong> JavaScript itself doesn’t give you much for making a game. It’s likely you’ll be writing a lot of code for features that would normally be “free” in a game engine. Game objects, animations, keyboard input, step loops, etc. Luckily there’s a vast ecosystem of open source libraries and frameworks ready for you to drop in. </li>
<li><strong>Decision paralysis</strong>. Along those lines, while a vast ecosystem of open source libraries exists, you will need to navigate the available options and make some choices. For example, you’ll need solutions for graphics, sound, potentially physics, rendering. Do you utilize libraries for these concerns or roll your own systems? Either path is valid, but you have to decide.</li>
<li><strong>Browser quirks.</strong> While the browser support story has never been better, some browsers will straight up be more performant than others. Something that runs great on Chrome, for example, may be slow and jittery in Firefox. Unless you explicitly choose to support only one browser, you’ll need to do a lot of cross-browser QA testing.</li>
<li><strong>Native distribution is arguably awkward</strong>. If you want your JavaScript game to be available on platforms like Steam, Electron and Tauri are two great options for wrapping your JavaScript game as a native app. While both are viable and generally easy to use, they come with their own quirks, baggage, and learning curves. And more decisions to make! The good news is that this avenue is tried and true these days, so you’ll be able to get your game packaged up after a bit of research and tinkering. That said, they are certainly not as “automatic” as exporting to native using an established game engine. There’s a lot of innovation happening in this space, so let’s all stay tuned!</li></ul>
<h2>Benefits of authoring in Godot</h2>
<ul><li><strong>Implementation speed.</strong> It’s wicked fast to get a prototype up and running. Godot’s pre-built Nodes likely provide everything you need to create a minimal playable version of your game idea. Physics, animations, cameras, tile sets, they are all there and ready for you. For example, a simple <code>move_and_slide</code> line of code in a CharacterBody2D will take care of hundreds of lines of physics code in a more manual approach.</li>
<li><strong>Built for games.</strong> While JavaScript game development sometimes feels unconventional, Godot is proudly designed and optimized for the output to be a game. You won’t spend anytime with styling tweaks or browser workarounds to make something <em>feel</em> like a cinematic video game experience. As you might expect, Godot has excellent runtime performance out of the box for loops, rendering, and a load of graphical configuration options. </li>
<li><strong>3D tooling</strong>. Godot has excellent 3D tools built in at the top level. In fact, the seamless switching of 2D to 3D contexts in Godot is one of my favorite features. </li>
<li><strong>Native support</strong> by default. Rather than “wrapping” your project in a way that can be run natively on Windows/Mac/Linux, or even a console like Nintendo Switch, Godot assumes you’re interested in distributing your game in this way and has export templates for each platform ready to go.</li></ul>
<h2>Drawbacks of authoring in Godot</h2>
<ul><li><strong>You are a bit constrained to the Godot IDE</strong>. Godot’s editor is fantastic, in my opinion, so it’s almost unfair to put this as a drawback. But, simply in contrast to JavaScript, you’ll likely have to be firing up the Godot editor to make most of your changes. Under the hood, the Godot editor is simply writing text files to your machine, but I’ve found those impractical to modify in an external text editor. GDscript files, however, can totally be edited in your preferred IDE of choice. You’ll still be booting up the Godot IDE pretty often to change Scene configurations and other settings. Worth mentioning that it’s a big beefy window.</li>
<li><strong>Version changes are more invasive</strong>. If you start your project in 4.x, you should probably plan to stick with that version for however many months or years it takes to finish your project. Version changes are coming fast, too, so it’s easy to quickly fall behind from being on the latest version, which is where the FOMO can get ‘ya. Upgrading a minor change (Like v4.0 to v4.1) usually is pretty smooth, but could introduce unexpected problems under your feet. I personally encountered some rough bumps when upgrading my v3.1 to v3.2 project back in the day. You’ll also need to install a new version of Godot to your development machine when changing versions, where you’ll want to be careful not to override previous versions if you still have projects that use them.</li>
<li><strong>Community information is fragmented, but improving.</strong> When searching for help online, be sure to watch out for the differences between versions 2, 3, and 4. They are wildly different. It can be frustrating as a beginner. That said, this is getting better as more people adopt Godot and the community standardizes where to find latest information. It’s worth noting that resources like Chat-GPT can help you translate older versions of Godot code to whatever version you are using.</li></ul>
<h2>Don’t sweat it</h2>
<p>If you’re on the fence, there’s no need to let the decision hold you up. Just pick the language you are most interested in and be on your way. Try not to agonize over the tech bits… it’s better to pour that mental energy into <em>the actual game</em>. If you had all the design answers and assets, I bet you could switch pretty quickly if the technology choice was too limiting.</p>
<h3>Just answer the question, dangit</h3>
<p>So <strong>generally speaking</strong>, what do I reach for these days?</p>
<ul><li>If it’s 3D, I’m reaching for Godot.</li>
<li>If I’m just trying to make a proof of concept, and it involves physics, it’s Godot.</li>
<li>If I want the lowest barrier of entry for people to try playing the game, it’s JavaScript.</li>
<li>If I’m going to be working on it for multiple years, it’s JavaScript.</li></ul>]]></content>
      </entry>
    <entry>
        <title>Behind the Scenes of Bad Ref (GMTK 2023)</title>
        <link href="https://coopmode.dev/articles/bad-ref"/>
        <id>https://coopmode.dev/articles/bad-ref/</id>
        <updated>2023-11-01T00:00:00.000Z</updated>
        <published>2023-11-01T00:00:00.000Z</published>
        <content type="html"><![CDATA[<p>We built a game in a single weekend! While it’s been a few months since we created this project, I wanted to take you on a journey of the development of our GMTK Game Jam submission: Bad Ref.</p>
<img src="https://res.cloudinary.com/dzfwb0xu5/image/upload/v1698792371/courses.drewconley.dev/images-for-articles/bad-ref/Y0qIIc_pi1vfe.png" alt="Bad Ref">
<p>Bad Ref is all about being a corrupt soccer referee. You do whatever it takes to help the Blue team to win.
You can play the game in your Desktop browser here: <a href="https://bluelemming.itch.io/bad-ref" rel="nofollow">https://bluelemming.itch.io/bad-ref</a></p>
<p><a href="https://mattjennings.io/" rel="nofollow">Matt</a>, <a href="https://glennlabarre.com/" rel="nofollow">Glenn</a>, and I built Bad Ref for the GMTK 2023 Game Jam. It’s an annual jam that runs every year in July. In short, we had one weekend to come up with a game idea and build a prototype from scratch. </p>
<p>I’m not big on hackathon-type things, but I’ve always been curious to try this particular jam. One weekend is so tight on time, yet semi-reasonable to fit in to real life.</p>
<p>We established three major guardrails as a team:</p>
<ul><li>Let’s make a game we were excited about playing. (Make this worth doing.)</li>
<li>Let’s actually finish and submit something to the jam. (Control our scope.)</li>
<li>Let’s not destroy ourselves in the process. (No pressure to stay up all night and crunch.)</li></ul>
<p>We agreed ahead of time to build the game with Excalibur JS. Matt and I have both used it a bit and felt like we could quickly spin something up. Excalibur ships with a ton of great features to get you working on a game quickly. (Especially things like Physics, which is a lot to roll on your own.)</p>
<p>This will be important later, but we took the time to figure out our “value delivery” pipeline before the jam started. I learned this from working at agency… too often, we get to the end of building something and have to scramble to get it “live” on production later. The agency always set up a value delivery system first, so there is a clear path to pushing the final work to production. I didn’t want to waste any time during the jam hours to thinking about how to get the production build right, etc, so we practiced pushing up a quick “Hello World” build to the game’s Itch page before the jam started.</p>
<h2>Day 1 - Friday</h2>
<p>On the first day of the jam, the theme was announced as “Roles Reversed”. It’s a broad idea on purpose, but was backed up with examples of Pong, but you are the ball! Or a sidescrolling platformer, but you are the ground elements instead of the jumping character.</p>
<p>We hopped into a Discord call and started throwing ideas on a Figma board. Most of our early ideas were other takes on the “Genre A, but you are B”. Like: Call of Duty, but you are the scoreboard. Or… The Sims, but you are the toilet. In hindsight, why on earth didn’t we pursue that one?</p>
<p>Anyway, we are on this call for like 12 hours straight. At some point we had gone down the path of a sports game, but you are the referee. Perhaps a corrupt one that is incentive to tamper with the outcome of the match. We talked about being able to mess with the players, or straight up stop the flow of play whenever you wanted. </p>
<p>We talked for a long time about the character’s motivation… like checks and balances to keep you from freely doing whatever you wanted to the players with no consequences. We circled around those ideas for a couple of hours, including building up a reputation system where the crowd would boo you off the field if you made too many “bad calls”. It got too complicated, though, and it was hard to validate up front if it was even going to be fun to play.</p>
<p>We went a hard other direction after that, like <em>more</em> ways you could mess with the players. Maybe more kinds of items you could use? Bear traps, fishing rods, an ice cream truck that would pull up and distract the goalies. </p>
<p>Before you know it, it’s 2 AM and we haven’t really <em>started</em> anything yet. We agreed to get some sleep, start again early the next morning. </p>
<h2>Day 2: Saturday</h2>
<p>We signed on early the next day and start chipping away at our individual roles. </p>
<p>Matt started putting broad strokes in the code. He added moving colored boxes for the soccer players, basic hero controls, and AI for getting the different positions to patrol their zones (Impressive as heck to get this all in on one morning, by the way). The ball would bounce around as players kicked it, too, which was pretty neat.</p>
<p>I was the main artist for this project, so I started pixeling some soccer players in Aseprite. I made one base character, then swapped out the head for a couple different variations. I also recolored everybody in a few different jersey options. I don’t have many hot takes in the soccer space except this one: Mega Man Soccer (SNES) is the best soccer game of all time, so I referenced those characters for rough sizes and general silliness. </p>
<p>We needed a field, ball, and goal nets too. I spent a stupid amount of time on the soccer ball rolling animation - I’d never tried anything like that before, so I had to reference games like Kirby pinball to wrap my head around the rolling motion.</p>
<p>Matt set up a really nice flow with Excalibur’s support for Aseprite files. I could export animation data and images from Aseprite (.json and .png), simply drop them in the project and they were ready to use.</p>
<p>At some point I shifted over to work on sound effects. I’ve always found sound effects tedious to work on, but gosh they add a lot of life. I found some free base samples of whistles, soccer kicks, and crowd cheers. I modified those quite a bit in Audacity to SNES-ify them as best I could. It’s a tough call to burn too much time on, but those little moves tend to add up in the final game.</p>
<p>By late afternoon, we had a fairly convincing soccer scene prototype. The movement, sounds, and graphics were gelling together pretty well. The players (and ref) could patrol and kick the ball around, but the game didn’t have a lot of purpose. It was a good sign that it was fun to just bop around in, but we needed some kind of winning/losing loop to give the player something to work on. </p>
<p>Matt wired up the collision zones within the nets for the ball, I threw some big scoreboard numbers up on the top left and top right of the screen to keep track of a score. We leveraged Excalibur’s event system to power the score counters upticking when the ball entered the net.</p>
<p>Somehow it’s 2 AM again on Saturday night (Sunday morning, I guess). We’ve come a long way, but the game is not quite anything submittable. We still needed a lot of polish and tuning to make it feel player-ready.</p>
<h2>Day 3: Sunday</h2>
<p>We get another handful of hours of sleep, then hop on early again for the final push. I think I signed on around 6 AM… the deadline was 12 noon in my timezone. </p>
<p>I shifted into music-creation mode, trying to quickly create a few tracks with the little time we had left. We were trying to inject a lot of humor in the game, so I started with something light and fun to emphasize this isn’t a super serious gaming experience. I freaked out halfway through that track, thinking I wasn’t getting anywhere, and switched over to a more “SNES action sports” drum and bassline. I didn’t know which one was the right call, so we used both. One for the menu, one for the soccer gameplay. I called the tracks “Overtime 1” and “Overtime 2” as an homage to being totally out of time to create anything better.</p>
<p>Matt was implementing the last bits of final polish we had time for. We even got the Ice Cream truck feature in!</p>
<img src="https://res.cloudinary.com/dzfwb0xu5/image/upload/v1698792373/courses.drewconley.dev/images-for-articles/bad-ref/hPv7o9_z1ymru.png" alt="Bad Ref Ice Cream Truck">
<p>Glenn was play testing everything, calling out bugs and tweaks we should consider. He also helped us prioritize everything we had to get in - it’s easy to lose track of the bigger picture when you are in the trudges of implementing details.</p>
<p>Eventually the deadline had arrived. We threw some intro text on the screen and pushed up one last build to our Itch page. Thankfully, that value delivery system was set up and ready to go so we could work up until the last second.</p>
<img src="https://res.cloudinary.com/dzfwb0xu5/image/upload/v1698792374/courses.drewconley.dev/images-for-articles/bad-ref/OR_rGd_gcdil8.png" alt="Bad Ref Players">
<h2>After</h2>
<p>We finished the weekend true to our guardrails!</p>
<ul><li><p>✅ Let’s make a game we were excited about playing. (We are proud of the result.)</p></li>
<li><p>✅  Let’s actually finish and submit something to the jam. (We cut features appropriately to finish on time.)</p></li>
<li><p>✅  Let’s not destroy ourselves in the process. (We generally did not overwork in an unhealthy way.)</p></li></ul>
<p>Despite the third guardrail, we were totally exhausted for a week after the jam. On top of our respective usual work weeks, marathoning over the weekend pushed us a <em>little</em> bit over the edge. Thankfully our families were very supportive the entire time.</p>
<p>Here’s a video with some more concepts and details of our GMTK 2023 Game Jam weekend.</p>
<iframe style="max-width:100%" width="560" height="315" src="https://www.youtube.com/embed/j7ZNQy0dF2g?si=mPOXT-nR8ZhmlZZT" title="YouTube video player" frameborder="0" allow="accelerometer; autoplay; clipboard-write; encrypted-media; gyroscope; picture-in-picture; web-share" allowfullscreen></iframe>
<p>We’ll see how life goes, but hopefully we’ll be able to participate again next year!</p>
<p>Drew</p>]]></content>
      </entry>
    <entry>
        <title>Write code directly in the browser with Chrome Overrides</title>
        <link href="https://coopmode.dev/articles/chrome-overrides"/>
        <id>https://coopmode.dev/articles/chrome-overrides/</id>
        <updated>2022-03-21T00:00:00.000Z</updated>
        <published>2022-03-21T00:00:00.000Z</published>
        <content type="html"><![CDATA[<p>Have you ever worked on a project where build times were slow, lower environments took awhile to edit, or you didn’t have a local setup to use at all?</p>
<p>Sometimes slow build times are the reality of web dev gigs. Maybe you support a legacy system that has grown complex over time, causing delays and tedious extra steps in workflows. Maybe you inherited a site that isn’t super practical to run on your machine… like it’s a certain-Windows Server-only-that-takes-gigs-of-RAM-to-run kind of thing.</p>
<p>Maybe you have to pass files to a DevOps person to file drop on a server and that’s the only way to iterate. Old-school FTP style! That might sound crazy in the modern world of web development, but I assure you it’s still a thing today.</p>
<p>I’m a big believer that quick feedback loops empower our best development. Fluid updates, quick iterations, getting ideas through the code and on the page as quickly as possible. It’s a drag when you need to run a bulky build process to see tiny HTML, CSS, or JavaScript changes. So, <strong>how might we iterate on front end code quickly,</strong> regardless of the build system?</p>
<h2>Activating Chrome Overrides</h2>
<p>Chrome has a sneaky feature that allows you to stub files from your local machine. The browser may download <code>index.html</code> from the website, but you instead want to see your own forked copy of <code>index.html</code>. You can apply changes to your local copy for quick iteration right within Chrome itself!</p>
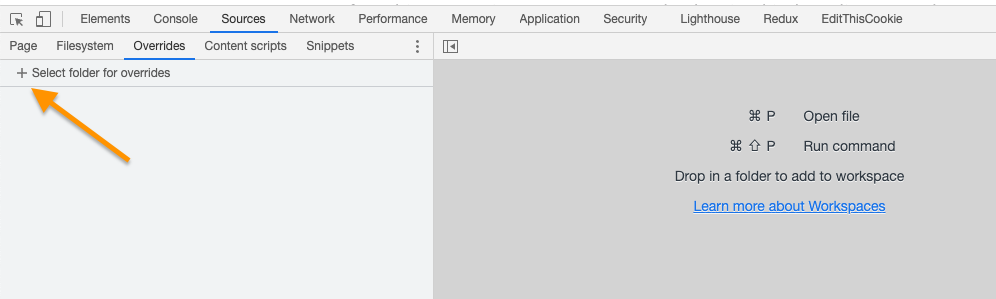
<p>First, find the Sources tab in Chrome Dev Tools and expand the sidebar so “Overrides” sub tab is visible.
Click “Select folder for overrides”.</p>
<img src="https://res.cloudinary.com/dzfwb0xu5/image/upload/v1622317073/blog-post-chrome-overrides/overrides-create_zgsjva.png" alt="Adding a local directory as an Override directory">
<p>From here, you can create a new directory on your machine (or specify an existing one) for Chrome to read and write files. The name of the directory you choose doesn’t matter.</p>
<p>If this is your first time adding an Overrides folder, Chrome will ask for permission. It will be writing files to your machine, so you need to click “Allow” before the feature will work.</p>
<img src="https://res.cloudinary.com/dzfwb0xu5/image/upload/v1622317073/blog-post-chrome-overrides/overrides-allow_p3zsuh.png" alt="Chrome permission prompt to read and write files">
<h2>Editing files</h2>
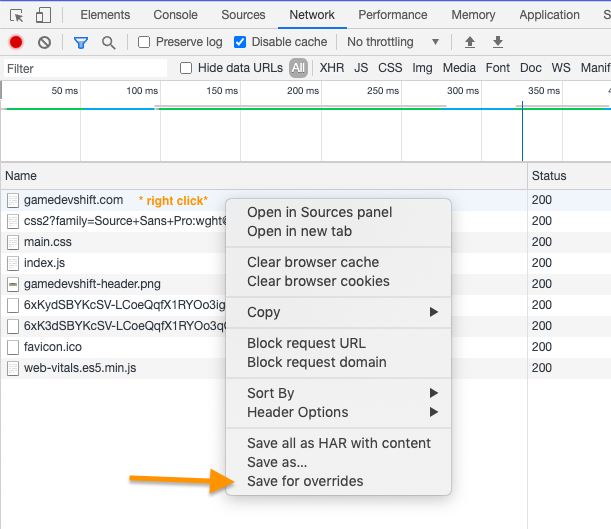
<p>Now that the feature has permission, right clicking <em>most</em> file names in Dev Tools will offer a “Save for overrides” option. This option will save a copy of the file to your Overrides directory at an equivalent local path. You don’t need to manually create the matching subdirectories or anything like that. Pretty nifty!</p>
<p>The Network tab is a good place to view all files being downloaded and utilized by the browser. You can find the file you want to edit in the list.</p>
<img src="https://res.cloudinary.com/dzfwb0xu5/image/upload/v1622317075/blog-post-chrome-overrides/overrides-add-file_kw5x6n.png" alt="Saving a file for overrides">
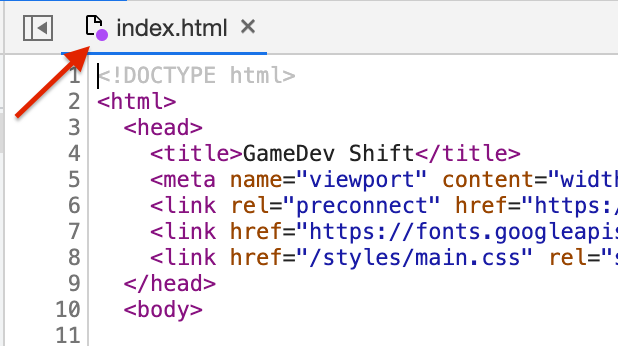
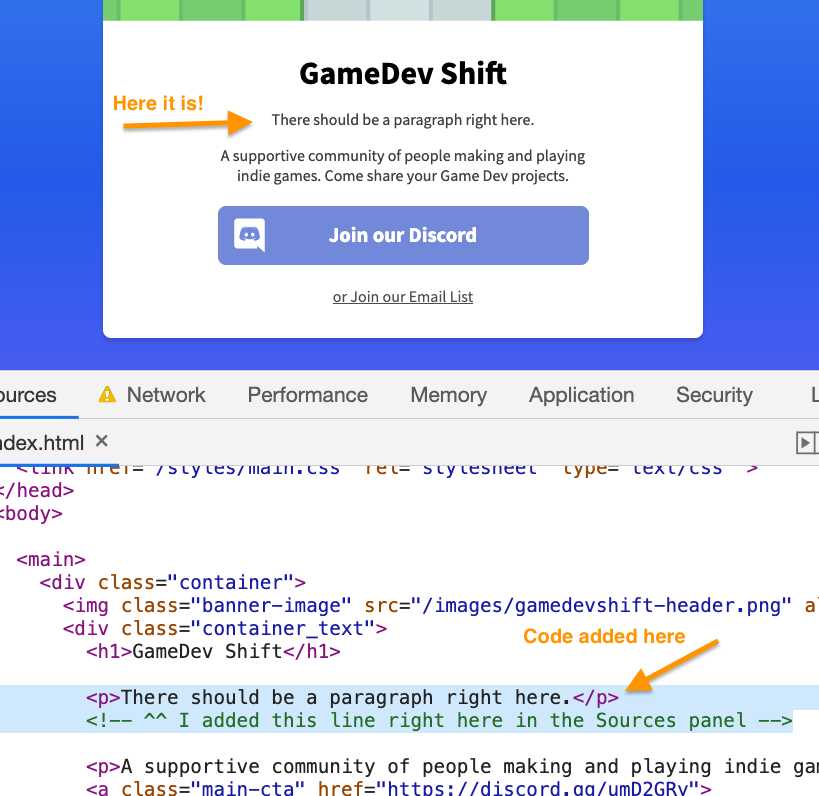
<p>Overriding a file will pop it open in the Sources panel. When a matching file is present in the Overrides directory, Chrome will put a little purple dot on the file name to indicate it is being used <em>instead</em> of the actual copy from the server.</p>
<img src="https://res.cloudinary.com/dzfwb0xu5/image/upload/v1622317074/blog-post-chrome-overrides/overrides-purple-dot_qskt5e.png" alt="File tab with override purple dot">
<p>You can edit this file and hit Ctrl/Cmd+S to save. This will save the file directly to your local Overrides folder. For HTML edits, changes will appear after reloading the page. The Sources panel, by the way, is a really nice code editing environment within Chrome Dev Tools. These overrides are just text files on your computer, so technically you can open them in any editor you want.</p>
<img src="https://res.cloudinary.com/dzfwb0xu5/image/upload/v1622317073/blog-post-chrome-overrides/overrides-live-html-edit_atabzj.png" alt="Editing HTML with local overrides">
<p>Live editing the DOM in the Elements tab is a thing, too, but those changes will be lost on page reload. Furthermore, those changes usually happen after the page is fully loaded and initialized. If you are riffing on tweaks for Performance or Core Vital improvements, you may be too late by only live editing with the Elements tab. All situations have their own nuance, of course, but I’ve found Overrides to generally be a better tool for trying out changes.</p>
<p>Overrides aren’t just for HTML. CSS and JavaScript changes can be made here, too!
For example, maybe you are riffing on a new design or style tweak. CSS changes will appear on the page right away, so you can quickly see the output of modified style rules.</p>
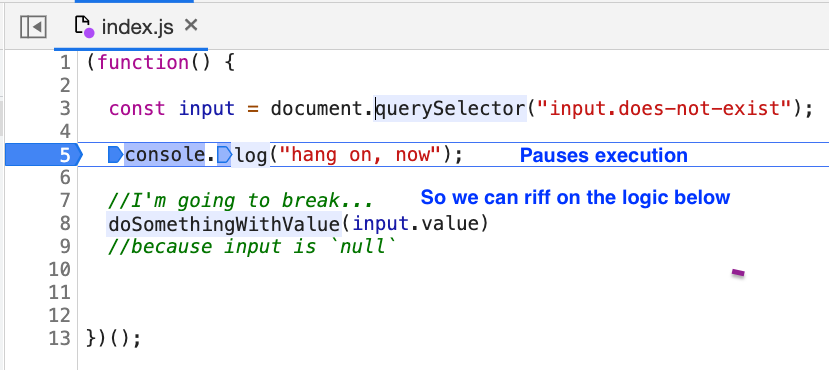
<p>Similarly, If you are trying to get to the bottom a gnarly JavaScript runtime error, you can quickly override the housing file, throw breakpoints in there, and edit the logic on the fly between breakpoint debugger stops!</p>
<img src="https://res.cloudinary.com/dzfwb0xu5/image/upload/v1622317074/blog-post-chrome-overrides/overrides-live-js-edit_tseqqg.png" alt="Debugging JavaScript code with overrides">
<h2>Gotchas</h2>
<p>A few things to consider:</p>
<ul><li>If you have a great local setup in your project, you probably don’t need the Overrides feature. I’ve found it to be useful in cases where it’s tedious to iterate on a project’s frontend code. (Long build times, can’t run the backend template language locally, etc.)</li>
<li>Overrides only live on your computer, so you have to backfill any real code changes into the actual repo. Again, this is probably the process that has friction in the first place. We’re trying to reduce the amount of times we need to do the tedious steps.</li>
<li>Remember to turn off the Overrides when you are done iterating! Simply uncheck the same checkbox in the Sources panel. I’ve had many “what the heck?” moments where I was getting stale versions of files instead of actual server versions because Overrides were still enabled.</li></ul>
<p>Nonetheless, Overrides are a quick, scrappy way of iterating on frontend changes. Pretty neat! I hope you try them out to reduce bumps in your project’s workflow.</p>
<p>If you prefer video content, here’s a YouTube video with more detail on this topic:</p>
<p><a href="https://www.youtube.com/watch?v=PT6xsr_AUQ0" rel="nofollow">Watch the screencast on YouTube</a></p>]]></content>
      </entry>
    <entry>
        <title>Debugging problems in GD Script code</title>
        <link href="https://coopmode.dev/articles/debugging-gdscript"/>
        <id>https://coopmode.dev/articles/debugging-gdscript/</id>
        <updated>2022-03-21T00:00:00.000Z</updated>
        <published>2022-03-21T00:00:00.000Z</published>
        <content type="html"><![CDATA[<p>Let’s look at some handy techniques for troubleshooting issues in your game’s GDScript code. Whether you are getting strange behavior, weird errors, or the game straight up isn’t doing anything, I hope this post will give you some pointers on getting to the bottom of code problems in Godot.</p>
<p>These tips start simple and get more complex as we go. Let’s get started!</p>
<h2>Tip 1: Print variable values to the Output console</h2>
<p>We’re starting basic here, but this tip is a critical building block of troubleshooting any programming language. It’s the first thing I reach for when learning a new engine, framework, or library… printing values to a console during runtime.</p>
<p><code>print</code> in Godot will take in a value, whether it is hardcoded or pulled from a variable, and plop it in the Output console. If you are coming from JavaScript, this is just like <code>console.log</code>. This is useful for making sure a variable’s value is getting set to what you expect. It’s also nice for making sure an area of code is actually executing.</p>
<pre>func _ready():	
	print(&quot;Hello!&quot;) #prints Hello
	
	var a = 1;
	var b = 2;
	var c = a+b;
	print(c); #Prints 3
</pre>
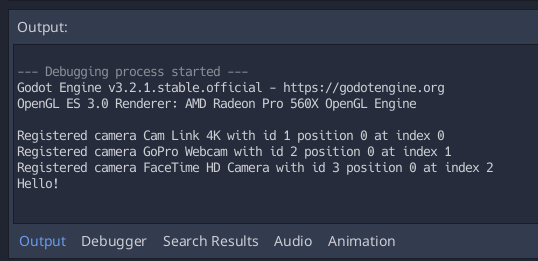
<p>Here’s a screenshot of the Output tab in Godot. You can find it towards the bottom of your Godot IDE window.</p>
<img src="https://res.cloudinary.com/dzfwb0xu5/image/upload/v1622598847/godot-troubleshooting-post/printing_jdbpzf.png" alt="Godot printing values to the Output panel.">
<p>Printing is handy, but you can see that the output doesn’t have a lot of context. It’s just the value all by itself. Like, “Hello”.</p>
<p>This is okay when only a few <code>print</code> lines are firing, but it can be hard to read when there are many logs happening throughout a project… or if a log is happening many times. It’s easy to lose track of what is what.</p>
<p>Powering up the <code>print</code>ed message with more information can help increase readability. Godot strings have a method called <code>.format</code> that can be used to inject values into string content. Again, if you are coming from JavaScript, it’s a little bit ES6 template literals. Utilizing this method can make <code>print</code> messages easier to read.</p>
<pre class="language-undefined"><!-- HTML_TAG_START --><code class="language-undefined">	func _ready():
		print(&quot;Score: &#123;score&#125;&quot;.format(&#123;&quot;score&quot;: score&#125;)
		# Prints &#39;Score: 200&#39;
		# ^^ This message is a little nicer to read than just &#96;200&#96;</code><!-- HTML_TAG_END --></pre>
<p>It usually makes sense to remove <code>print</code> lines after you’re done reading them. Otherwise, the Output console will quickly get noisy as the project grows. There are times where it makes sense to keep <code>print</code> lines around, maybe in places that are often referenced… or for alerting of edge cases that may appear as you work on other parts of the game.</p>
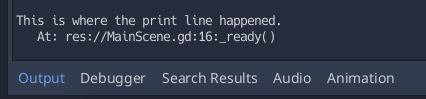
<p>In these cases, a special flavor of print can be used: <code>print_debug</code>. This command will print the value just as before, but also include the file and line number of the function call. This helps quickly track down where the log is happening.</p>
<img src="https://res.cloudinary.com/dzfwb0xu5/image/upload/v1623423363/godot-troubleshooting-post/print-debug_o99n0x.png" alt="Debug information showing in Godot's console">
<p>Godot’s documentation covers the different variations of <code>print</code>. Check them out <a href="https://docs.godotengine.org/en/3.3/classes/class_@gdscript.html#class-gdscript-method-print" target="_blank">here</a>.</p>
<h2>Tip 2: Use the Debugger</h2>
<p>Godot’s built in Debugger is top notch… definitely one of my favorite IDE debugging experiences in any editor I’ve used before. Learning to use the Debugger will enable you to quickly navigate logic problems in your game’s code.</p>
<p>Godot’s Debugger is always watching for Breakpoints in our game’s code during execution. GDScript gets executed line by line, one at at a time. When one of those lines contains a Breakpoint, Godot will stop execution and give us a chance to look around before proceeding. It feels like being in The Matrix when characters stop time and do the cool ninja jump.</p>
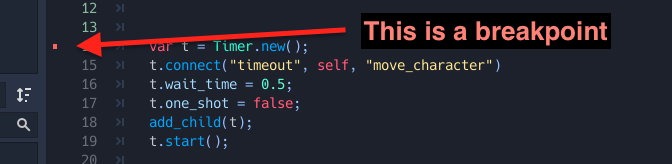
<p>To add a Breakpoint, click just beyond the left side a line number in Godot’s Script editor. You’ll see a red dot appear on the line. Here’s a screenshot:</p>
<img src="https://res.cloudinary.com/dzfwb0xu5/image/upload/v1623426466/godot-troubleshooting-post/breakpoint2_do4i34.png" alt="A breakpoint in Godot's Script editor">
<p>Run the code and you’ll notice the engine pauses on the Breakpoint line.</p>
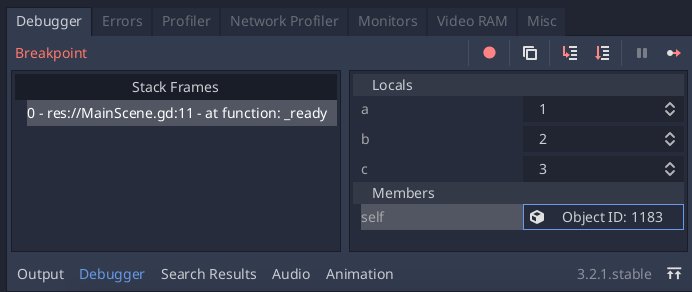
<p>While the code is paused, you can pop over to the Debugger panel and read the values of all relevant variables and Nodes. The panel even divides out local, member, and global variables. In many cases, you can live edit the values right here. They will instantly update in the actual running game!</p>
<img src="https://res.cloudinary.com/dzfwb0xu5/image/upload/v1623426627/godot-troubleshooting-post/inspecting-debugger-values_kvx1uh.png" alt="Inspecting values while stopped at a breakpoint">
<p>While paused, the debugger gives you a few tools to use to navigate through code. Here’s a breakdown of the tools:</p>
<ul class="post_debugger-tool-list"><li><img src="https://res.cloudinary.com/dzfwb0xu5/image/upload/v1622598847/godot-troubleshooting-post/icon-2_qtxkqt.png" alt="Step Into">
		<strong>Step Into (F11)</strong>. This button will execute the current line of code, then jump and pause on the <i>very next</i> line of code that will happen. If this line of code executes a function call, for example, the Debugger will warp you inside that next actual function so you can step through everything it does. This &quot;one step at a time&quot; approach is great for navigating complex multi-function logic journeys.
	</li>
	<li><img src="https://res.cloudinary.com/dzfwb0xu5/image/upload/v1622598847/godot-troubleshooting-post/icon-3_de9ban.png" alt="Step Over">
		<strong>Step Over (F10)</strong>. Similar to Step Into, but the execution will simply fast-forward through external function calls. This is handy for keeping the debugger focused on the current method and is also less disorienting. If you are certain an issue is happening inside the method that the Debugger is paused in, this button is the way to go.
	</li>
	<li><img src="https://res.cloudinary.com/dzfwb0xu5/image/upload/v1622598847/godot-troubleshooting-post/icon-4_now7fb.png" alt="Continue Execution">
		<strong>Continue (F12)</strong>. This button simply resumes the normal execution of code. The game will continue to run as normal until it finds another Breakpoint.
	</li>
	<li><img src="https://res.cloudinary.com/dzfwb0xu5/image/upload/v1622598847/godot-troubleshooting-post/icon-1_kmmncp.png" alt="Skip Breakpoints">
		<strong>Skip Breakpoints</strong>. This toggle temporarily disables Breakpoints. When a lot of Breakpoints are sprinkled through the code, you may find yourself wanting to run the game as normal without needing to remove all of those Breakpoints. Maybe you need them again in a second. Sometimes it is handy to leave them around.
	</li></ul>
<p>Breakpoints and the Debugger are very effective for stepping through complex logic. While the controls take some practice, embracing them may speed up your workflow.</p>
<h2>Tip 3: Check for Errors and Warnings</h2>
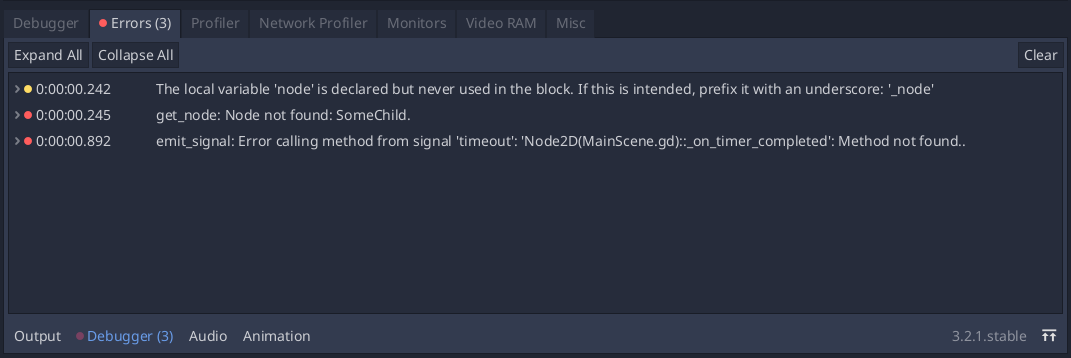
<p>Sometimes our code will run without crashing the game in runtime errors, but our expected result still does not occur. It feels like the code is silently ignoring what you want it to do. After double and triple checking that everything is named and spelled correctly, it may be time to look in the Warnings tab.</p>
<p>The Errors tab provides feedback for (you guessed it) Warnings and Errors. These areas of feedback can be found in the Errors tab:</p>
<img src="https://assets.codepen.io/21542/GodotOutputWarningsAndErrors.png" alt="Errors tab">
<p>Warnings are in yellow. They often call out linting or formatting issues and provide tips for correcting them. You can configure the pickiness of Warning messages in Project Settings under Debug/Gdscript.</p>
<p>Errors shows up in red. They are a bit more serious. Perhaps the code tried to access a node, but the node wasn’t there. Well, that was an extra bit of unnecessary work that the engine had to do… so Godot is upset about it. That’s an Error.</p>
<p>Maybe we tried to connect a method to a signal, but the wrong number of arguments were declared in the method signature. Godot doesn’t like that, either… the connected method will never fire. I’ve spent <em>many</em> hours trying to debug why a connected signal wasn’t firing. This feedback quietly shows up as an Error in the tab. The Errors tab would have told me the problem right away.</p>
<p>The Error tab also calls out how many total pieces of feedback have been logged. This number will probably grow as you build and play through your game, so keep an eye on it and address issues as they occur.</p>
<h2>Tip 4: Remote Inspect</h2>
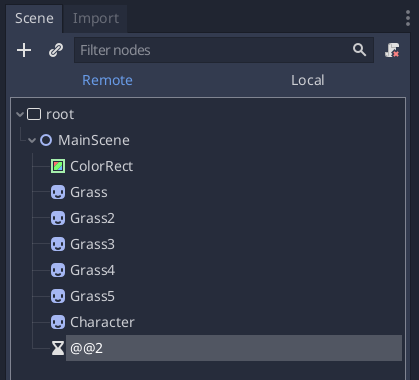
<p>Finally, when things are truly off the rails, Godot’s Remote Inspect feature is here to save the day. Remote Inspect allows you to dig through the Scene tree of your currently running game. Start your game or Scene, click Remote, now you will see the full content of your currently running game.</p>
<img src="https://res.cloudinary.com/dzfwb0xu5/image/upload/v1622598848/godot-troubleshooting-post/remote-tab_tzingg.png" alt="Godot's Remote tab while running a game">
<p>The Remote tab is great for verifying all nodes are present and nested in their expected order. For example, maybe a script is creating and nesting child Nodes within a specific parent on the fly. The Remote Tab will tell us if the children are actually landing in the correct layer, along with their actual names and information. The Remote Scene Tree looks and behaves just like the normal Node creation and development experience.</p>
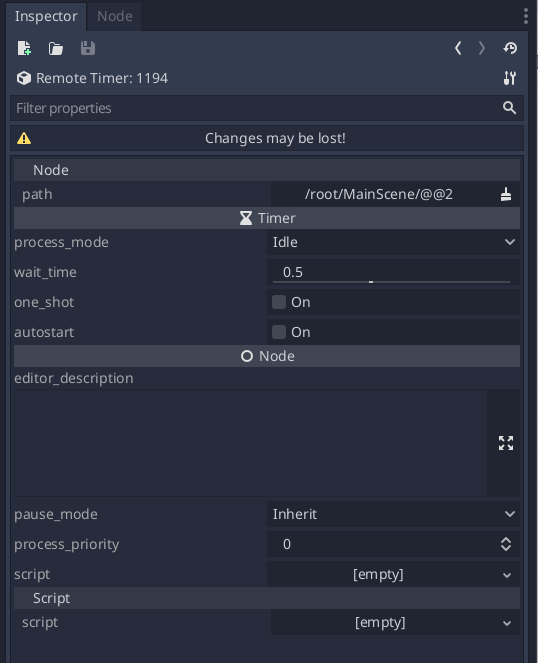
<p>This tool is also nice for investigating visual problems. For example, if we add a node to the scene but don’t see it, it’s possible the node is present but outside of my Camera viewport. Maybe the <code>position</code> was set horribly wrong. In these cases, we can pop open the Remote tab, find the relevant node, and tweak the position.</p>
<img src="https://res.cloudinary.com/dzfwb0xu5/image/upload/v1622598848/godot-troubleshooting-post/inspect-with-remote-tab_qxi3tl.png" alt="Editing values on the fly with the Remote tab">
<p>Similar to tweaking values with the Debugger, edits in the Remote Tab instantly appear live in the game window. It’s handy for quickly prototyping positions, layering, and values without needing to start and stop the game between edits.</p>
<h2>That’s all for now!</h2>
<p>These four concepts pretty much cover all of my troubleshooting strategies in GDScript. For more detail, here’s a screenshare video in which I show the techniques in action:</p>
<p><a href="https://www.youtube.com/watch?v=-LCBgGK-BAk" rel="nofollow">Watch the video on YouTube</a></p>
<p>If you have comments, questions, or tips of your own, feel free to email me or join us on <a href="https://discord.gg/umD2GRy" rel="nofollow">Discord</a>.</p>]]></content>
      </entry>
    <entry>
        <title>Ways to get Feedback on your game dev project</title>
        <link href="https://coopmode.dev/articles/get-feedback"/>
        <id>https://coopmode.dev/articles/get-feedback/</id>
        <updated>2022-03-21T00:00:00.000Z</updated>
        <published>2022-03-21T00:00:00.000Z</published>
        <content type="html"><![CDATA[<p>You’ve been working on your game for weeks, months, maybe even years, pouring your heart and soul into it. When you’re “heads down” in the weeds of development, it’s sometimes easy to lose track of the bigger picture question: will people even like this game? Especially when you are working on the game alone.</p>
<p>Getting feedback from other people is a critical tool that can help fill in those gaps and help you improve the experience of your game. But how do you go about getting feedback? Here are some of the tips and tricks I’ve been using.</p>
<h3>Way 1: Put a feedback form directly inside your game.</h3>
<p>Make it quick and easy for people to jot thoughts down as they play. Let them capture thoughts right there in the moment.</p>
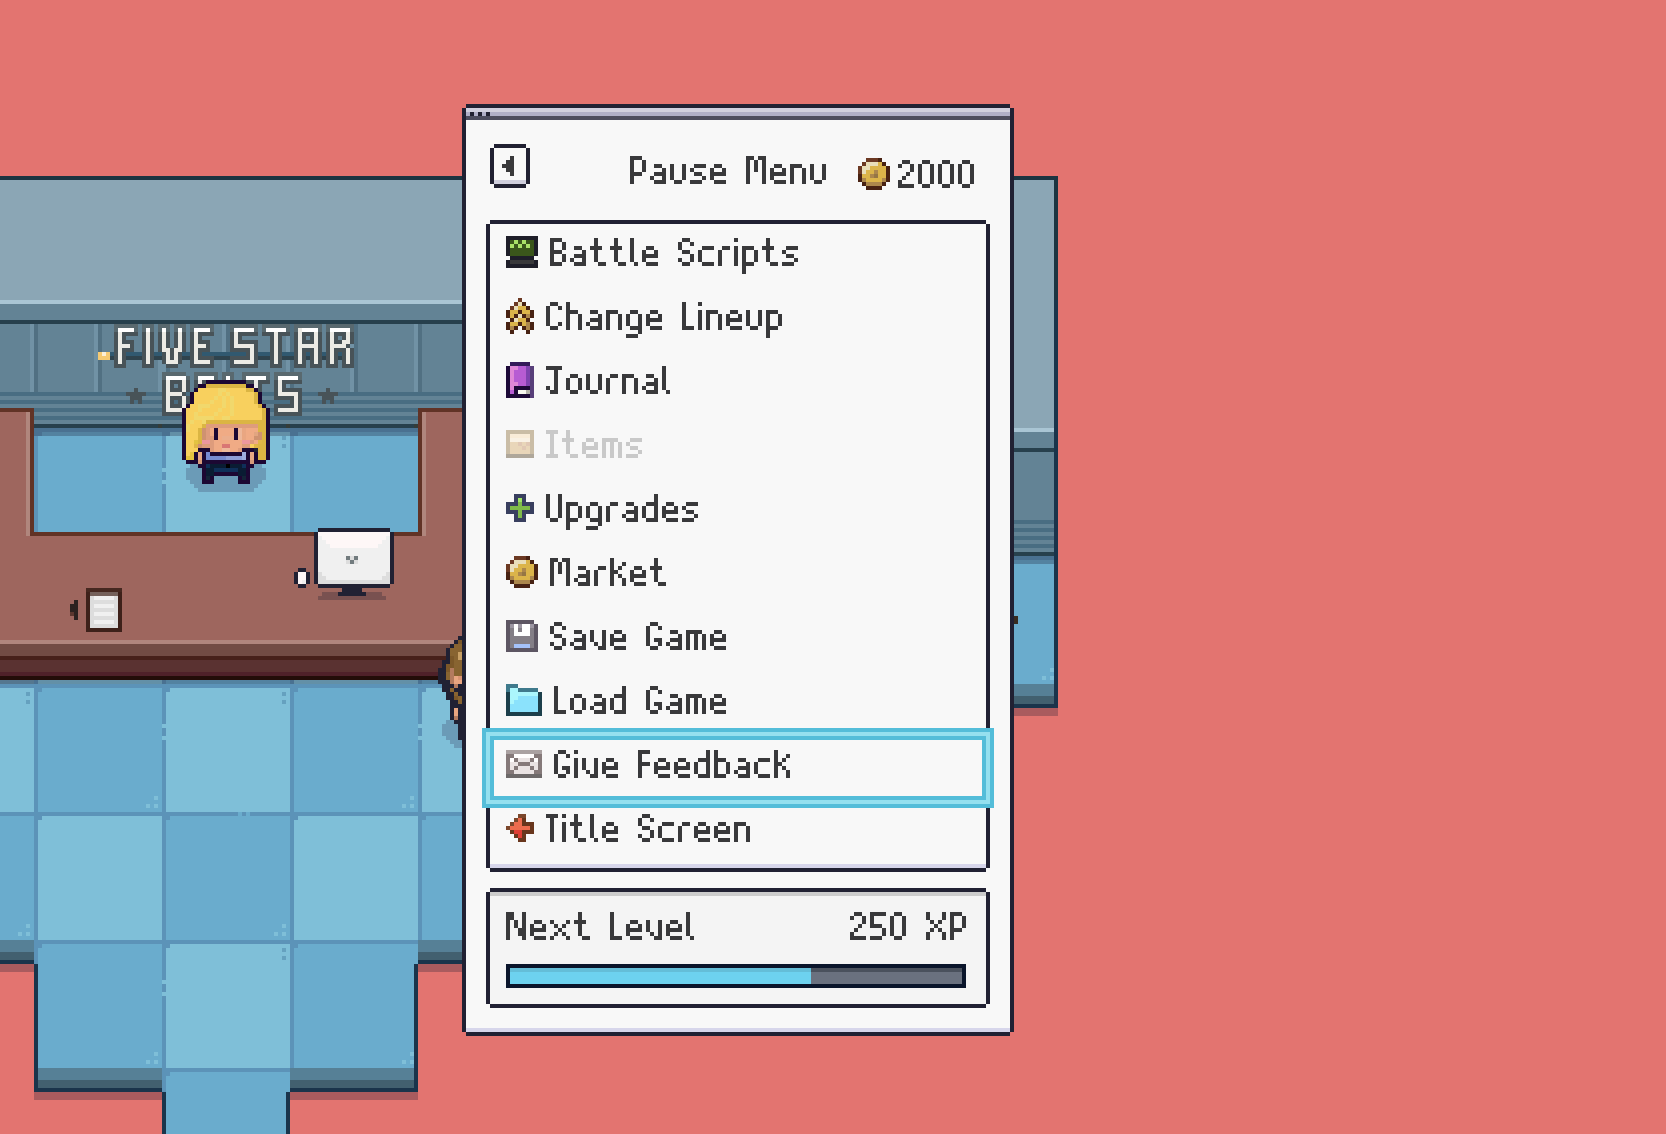
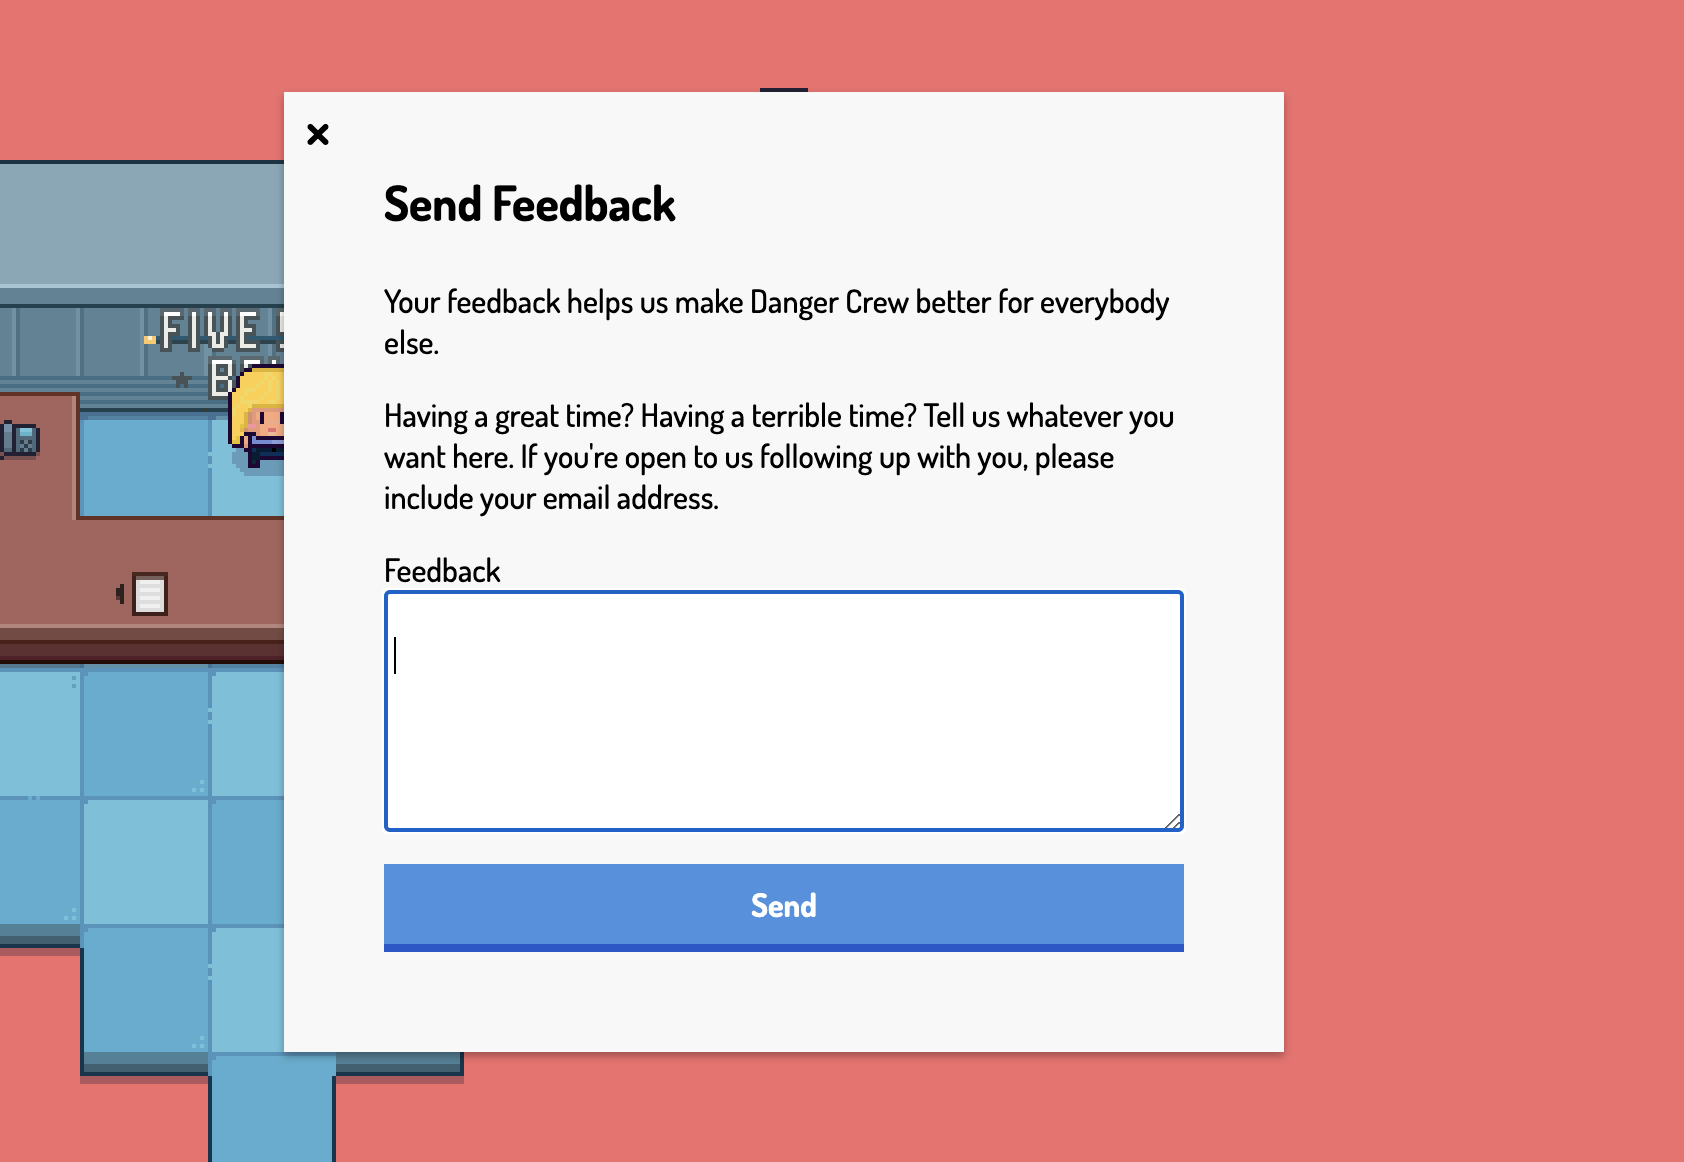
<p>We tried this in Danger Crew by adding a <strong>Feedback</strong> option in the game’s Pause Menu. Players could pause the game and type whatever they want into the form’s text input. The comments were sent directly to our web-server. After a few people had filled out the form, we were able to look through the messages and find patterns in what people were saying. We referenced the patterns when creating patch updates for the game.</p>
<img src="https://res.cloudinary.com/dzfwb0xu5/image/upload/v1648920238/gamedevshift.com/post-images/feedback-1_ffre1t.png" alt="Danger Crew Pause Menu Feedback in Menu">
<img src="https://res.cloudinary.com/dzfwb0xu5/image/upload/v1648920238/gamedevshift.com/post-images/feedback-2_ug2x8m.png" alt="Danger Crew Pause Menu Feedback Form">
<p>I prefer to provide a single open input for people to type whatever they want, rather than having hyper-specific questions in the form. Open-ended questions allow people to reveal things that otherwise would be completely off your radar to ask about. Questions that are too specific may be limiting.</p>
<p>The form in Danger Crew also recorded the current area of the game the player was in. Knowing their location gave us context to exactly where the player was when they wrote the comment. If the players were lost or frustrated, it was clear to us exactly which part of the game they were talking about.</p>
<p>I learned this trick from <a href="https://www.youtube.com/watch?v=izZcrG4WqGI&t" target="_blank">a GDC talk</a>, by the way.
In this presentation, a UX Researcher at Bungie discusses the process used for gathering user feedback on the first Destiny game. It’s a great watch and also speaks to the value of contextualizing feedback as it comes in.</p>
<p>If you include a form in your game, it’s a good idea to offer an <em>optional</em> email address field so you can keep in contact with people who leave comments. I failed to include an email address field inside Danger Crew’s form, and I regret it all the time. People would leave helpful feedback, but I had no way to ask follow-up questions or thank them.</p>
<h3>Way 2: Add quantitative analytics to your game</h3>
<p>People often say one thing but do another. Raw facts about their behavior may be the bits of information you need to make decisions when designing something.</p>
<p>If you work on websites, you may be familiar with libraries like Google Analytics that track page hits and activity. Consider adding something like this to your game’s code to record when specific events happen.</p>
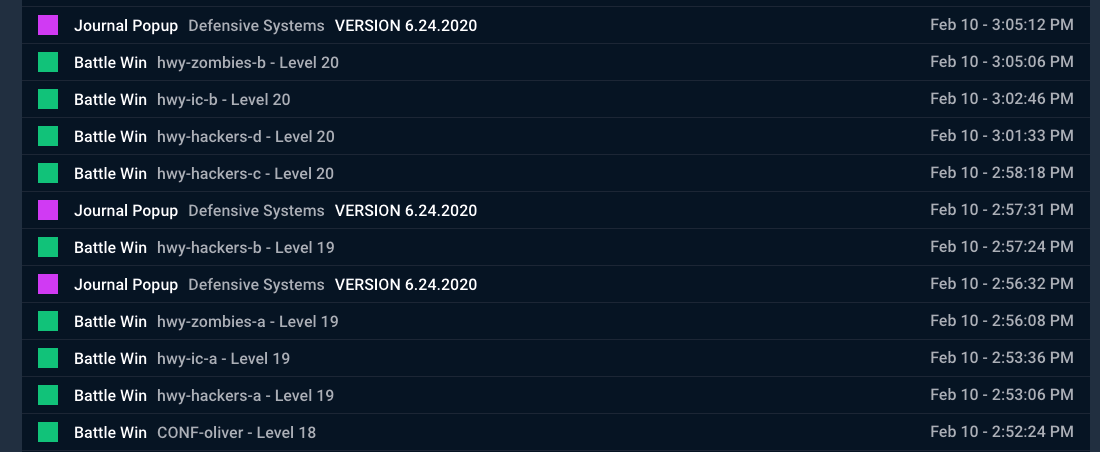
<p>We had a battle tracker in Danger Crew that helped us know which battles players were consistently winning and losing. It helped us tweak the difficulty of battles.</p>
<img src="https://res.cloudinary.com/dzfwb0xu5/image/upload/v1648919980/gamedevshift.com/post-images/battle-monitor_hqtvmk.png" alt="Battle Analytics">
<p>Some analytics ideas:</p>
<ul><li>Track player progression over time, like how long it takes to complete a quest.</li>
<li>If your game has an open world, track the order in which they complete events. You may find trends that influence future iterations.</li>
<li>Track if players are discovering the secrets you put in. Maybe hidden items you’ve tucked away or bonus rooms.</li></ul>
<p>If you’re building a web-based game, you could potentially use an off-the-shelf analytics tool, like Google Analytics. If you’re using a more traditional game engine, you may need to build something yourself - anything that shoots player activity to a web server. Remember to keep it all anonymous.</p>
<h3>Way 3: You need to watch people play the game.</h3>
<p>But not in an awkward way.</p>
<p>The best way we received feedback for Danger Crew was by watching streamers play the game on Twitch.</p>
<p>I had a few leftover promotional Steam keys, so I reached out to some streamer friends to see if they’d want to play our game on stream. I was expecting it to be a marketing thing, but it ended up being a fantastic user research test.</p>
<p>We watched a handful of streamers play the game and immediately noticed areas where people were getting caught up, like when UI was unclear or frustrating. It was all available to us by just watching a recording of them play.</p>
<p>Streamers are typically in their own space, at their own computer, comfortable and hanging out with their friends while streaming the game they are playing. You can see their screen and observe natural reactions to events as they occur. It’s a great way to get natural feedback. It’s way less awkward than lingering over somebody’s shoulder as they play your game.</p>
<p>A good way to find potential streamers is by browsing Twitch looking for people who play games like yours. Danger Crew was inspired by Super Mario RPG, Earthbound, and Pokemon, so I started with those games. If the streamer has contact information listed, you can reach out to them and pitch your game demo. (If they don’t have contact information listed, do not contact them.) I’ve found many of them stoked to show something new on their stream.</p>
<p>This process may introduce you to people who genuinely love and understand the genre of game you are making. Their feedback will go a long way in patching improvements and refining ideas.</p>
<h3>Way 4: Show your game to other game developers</h3>
<p>These are people also walking the walk of making a game, who understand the trudge and struggles you’ve been through to get to this point.</p>
<p>It’s highly likely that an experienced gamedev has been in your exact shoes before. They may be able to fill in any knowledge gaps you aren’t thinking about or reveal other random gotchas that you’ll run into down the road. </p>
<p>They may be able to mine-sweep potential road bumps that you’ll run into as you finish your game. Like, technical quirks about your game that you’re going to run into while getting on Steam. Missing features you should definitely have that people will be asking for after launch, that kind of thing.</p>
<p>Our <a href="https://discord.gg/umD2GRy" rel="nofollow">Discord Community</a> has a lot of fellow game developers who would be willing to check out your project and give you feedback. Just ask!</p>
<h3>Feedback is just feedback</h3>
<p>Remember that you are not obliterating or abandoning the vision for your game by asking for feedback, you’re just opening yourself up to the input of other people to help you make your game better. It’s okay to disagree with somebody’s opinion about your game.</p>
<p>For example, many players wanted us to add multiplayer support to Danger Crew, but we wanted to create a focused, solo story experience. We tried creating a multiplayer demo out of curiosity, and it was fun, but it didn’t fit the game we wanted to make. <a href="/articles/dangercrew-battle-demo">Here’s an older post about that process</a></p>
<p>You’ll never please everybody, but do listen to people! Try to understand what they are saying and where they are coming from. Ultimately, it’s your decision to adopt any changes they suggest.</p>
<p>Good luck in your venture for player feedback! Let me know how it goes.</p>]]></content>
      </entry>
    <entry>
        <title>Animating sprite sheets with Godot's AnimationPlayer</title>
        <link href="https://coopmode.dev/articles/godot-animation-player"/>
        <id>https://coopmode.dev/articles/godot-animation-player/</id>
        <updated>2022-03-21T00:00:00.000Z</updated>
        <published>2022-03-21T00:00:00.000Z</published>
        <content type="html"><![CDATA[<p>Sprite sheets are a common asset in any 2D pixel art game. Godot’s built in AnimationPlayer node makes it fast and easy to animate characters in Godot games. </p>
<p>I created a few screencasts over on YouTube to demonstrate the feature and share how I approach animating characters in Godot projects. If you’re new to Godot, I hope these quick videos will help kickstart your animation productivity.</p>
<img style="max-width: 600px" class="animation-player-content-image" src="https://res.cloudinary.com/dzfwb0xu5/image/upload/v1648912942/gamedevshift.com/post-images/content-godot-animation-1_mo9bir.png" alt="Character walking sprite sheet">
<h2>Part 1: Setup and basics</h2>
<p>In the <a href="https://youtu.be/FEwE6myyz_I" target="_blank">first video</a>, we cover the basics of getting started with AnimationPlayer:</p>
<ul><li>Creating the initial Character</li>
<li>Sprite Sheets in Godot</li>
<li>Godot’s AnimationPlayer node</li>
<li>Changing Frame on AnimationPlayer timeline</li>
<li>Adding a hat layer to our character</li>
<li>Animating hat position as the character’s body moves</li>
<li>Toggling layers on and off, like unlockable clothing</li></ul>
<img style="max-width: 600px" class="animation-player-content-image" src="https://res.cloudinary.com/dzfwb0xu5/image/upload/v1648912942/gamedevshift.com/post-images/content-godot-animation-2_blqaby.png" alt="Character with hat layer">
<h2>Part 2: Other frames and timeline events</h2>
<p>We get a little bit more advanced in the <a href="https://youtu.be/-Q9wvJ5Kpeo" target="_blank">second video</a>, with multiple facing directions and other types of animations.</p>
<ul><li>Creating a Hat frame track</li>
<li>Other facing directions for the character</li>
<li>Using GDScript code to trigger animations</li>
<li>Non-looping animations for single interactions</li>
<li>Calling methods in code at the perfect time via the <code>call_method</code> timeline track.</li>
<li>Stateful detail changes to the Character sprite</li>
<li>Workflow tips for staying organized</li></ul>
<p>If you have your own tips for animating characters in Godot, be sure to swing by our <a href="https://discord.gg/umD2GRy" rel="nofollow">Discord</a> and share your knowledge with the community.</p>]]></content>
      </entry>
    <entry>
        <title>Learn Knockout JS Right Now</title>
        <link href="https://coopmode.dev/articles/knockout-videos"/>
        <id>https://coopmode.dev/articles/knockout-videos/</id>
        <updated>2022-03-21T00:00:00.000Z</updated>
        <published>2022-03-21T00:00:00.000Z</published>
        <content type="html"><![CDATA[<p>Do people still use Knockout these days? Heck yes, people do! Knockout is great.</p>
<p>Just this year, my team at work inherited a large website that was written all in Knockout. We were tasked with building on top of the codebase, extending it with new features, and implementing a bunch of design changes.</p>
<p>As tempting as it was to just start over with something more modern like React, Vue or Svelte, we simply didn’t have the time. It was a tight deadline and the expectation was for us to keep the existing architecture. This is often a reality of any web developer gig.</p>
<p>And that meant we had to quickly learn Knockout…</p>
<p>I figured, if that happened to us, it might very well happen to somebody else out there. I made some tutorial videos on my tiny, casual YouTube channel to quickly spin people up on the basics of picking up Knockout.</p>
<p>What I’ve found is that Knockout, even today, is still <strong>a really awesome choice</strong>. It has a pretty straightforward feature set and doesn’t require a build step. So, if you have something that’s just stateful enough to be a little bit of a pain in vanilla JS, like a complicated form, but not quite complicated enough to warrant something like React, Knockout might be a really great choice for you.</p>
<p><a href="https://youtu.be/XhfPaNTEuTs" rel="nofollow">Watch the series on YouTube</a></p>
<p>If you have your own stories or experience to share regarding Knockout JS, feel free to email me or join us in <a href="https://discord.gg/umD2GRy" rel="nofollow">Discord</a>.</p>]]></content>
      </entry>
    <entry>
        <title>Let's build a multiplayer game with Firebase and JavaScript</title>
        <link href="https://coopmode.dev/articles/multiplayer-with-firebase"/>
        <id>https://coopmode.dev/articles/multiplayer-with-firebase/</id>
        <updated>2022-03-21T00:00:00.000Z</updated>
        <published>2022-03-21T00:00:00.000Z</published>
        <content type="html"><![CDATA[<img src="https://res.cloudinary.com/dzfwb0xu5/image/upload/v1648916705/gamedevshift.com/post-images/multiplayer-demo_ihjqo7.png" alt="Online multiplayer game">
<p><a href="https://youtu.be/xhURh2RDzzg" target="_blank">Here&#39;s a screencast on YouTube</a> where we create a simple online multiplayer game from scratch with HTML, CSS, vanilla JavaScript and Firebase.
</p>
<p>Firebase is one of my go-to technologies for making anything involving real time data. We stick to vanilla JavaScript here, but you can take these concepts and apply them to whatever front end framework you like to use (React, Vue, Angular, etc).</p>
<p>We’ll also cover a few basic game features like top-down movement, sprites, basic collisions, and keeping track of individual player scores.</p>
<p>Hope you enjoy working with Firebase. If you have a cool multiplayer game in the works, be sure to tell us about it in our <a href="https://discord.gg/umD2GRy" rel="nofollow">Discord</a> community.</p>
<h3>Extra Resources</h3>
<p><a href="https://drive.google.com/file/d/17DxaXc30rCoy4eBV-avcwdA_nYDd_Ikl/view?usp=sharing" rel="nofollow">Download the code</a> (You’ll need to set up a Firebase app to use it. Please read the notes in the security-rules file!)</p>
<p><a href="https://firebase.google.com/docs/web/setup" rel="nofollow">Firebase docs</a></p>]]></content>
      </entry>
    <entry>
        <title>Should You Build an Editor?</title>
        <link href="https://coopmode.dev/articles/should-you-build-an-editor"/>
        <id>https://coopmode.dev/articles/should-you-build-an-editor/</id>
        <updated>2022-03-21T00:00:00.000Z</updated>
        <published>2022-03-21T00:00:00.000Z</published>
        <content type="html"><![CDATA[<p>If you are in the early days of working on a game or starting to <em>think</em> about working on a game, I want to help you answer the question: Should you build a dedicated editor for yourself?</p>
<p>When I say “dedicated editor,” I mean custom applications, programs, or scripts that are hyper-specific to productivity on your project. I’ll be honest in saying that in the past few games and the current one I’m working on, building an Editor has been one of the best decisions I’ve made during the whole process.</p>
<p>Now, “editor” here seems like an overly fancy term. We’re just talking about tools, big or small, that you make for yourself to help you generate or change data that your game code reads. Imagine all of the content in your game being powered by JSON objects, for example. Instead of authoring those by hand, maybe creating an editor that <em>outputs</em> JSON will save you a lot of time.</p>
<p>The key is making it easy for yourself to work on your game. If adding or changing content is tedious in any way, you are putting yourself at risk of burnout and/or creating a game that is difficult to support in the long run.</p>
<p>Here are some reasons you may consider building an editor. </p>
<h2>Content is King</h2>
<p>As developers, we’re prone to getting shiny object syndrome in wanting to keep adding new features, changing game mechanics, or refactor code until it’s perfectly abstracted. It’s sometimes easy to forget that the most important thing we can do for our players is <strong>give them something to play</strong>. Sometimes the best thing to do is leave the feature code alone and add more content to the game.</p>
<p>Most of my projects have been top-down turn-based RPGs, so “content” has meant quests, dialog interactions, maps, bosses, etc. Every game will have its own unique needs.</p>
<p>It can be a drag to create new content manually, whether you are baking cutscene events into code or writing out JSON configuration files yourself, especially when you don’t have inspiration or vision of what the scene should be. Having tools to help you automate and create things quickly can provide motivation and get you over productivity bumps. </p>
<p>For example, In our upcoming game, Happy Grumps, Glenn built a tilemap editor directly into the game that is only visible when a development flag is turned on. Glenn can use these tools to place objects in the game, try them out, and hit a button to write the data directly into the game code. It took a little bit of extra effort to build out these features, but now it only takes seconds instead of hours to commit the level idea back into the repo. Happy Grumps is built with Game Maker, which already has a great tilemap editor, but this refined “Happy Grumps specific” version caters <em>exactly</em> to the project’s needs.</p>
<img src="https://res.cloudinary.com/dzfwb0xu5/image/upload/v1648920447/gamedevshift.com/post-images/hg-editor_w6nfyk.png" alt="Happy Grumps tile editor">
<h2>Quickly react to user feedback</h2>
<p>Another massive advantage of managing your content in an editor is that it enables you to react to user feedback quickly.</p>
<p>We received some rather vocal feedback from a few people who got lost and frustrated in the first chapter of our game, Danger Crew. There was a particular crossroads early in the game that was causing confusion. You had to navigate all the way around a large building to reach a particular area, but once you arrived, we gave you a shortcut to quickly loop back to where you came from. We observed somebody play the game, go the wrong way at the shortcut, lose their bearings, get frustrated, and quit altogether — Wom wom.</p>
<p>With two clicks in our editor, we placed an NPC at the crossroads to block people from going the wrong way at the loopback point. This quick edit closed off the connecting path, which I initially thought would be handy, and turned the area into a totally linear experience. The whole chapter was more streamlined.</p>
<p>As a bonus, this feedback helped us form an opinion that chapters should be either TOTALLY LINEAR or OPEN. Any areas stuck in the middle of that spectrum felt like an identity crisis.</p>
<p>Another time, we noticed through analytics that many players were losing a particularly tough battle over and over. Using the editor, we were able to add an interactive object in the game that revealed a tip for winning this battle. Again, it only took a few clicks.</p>
<p>These are two small examples, but these kinds of situations came up over and over as we built the game. We could have made either of these edits in manual code, but the changes would have taken much longer to track down the correct place and possibly be prone to human error.</p>
<h2>Organizing your code for an Editor to provide data.</h2>
<p>So, let’s say you are sold on having an editor application. How do you prepare your game code to accept input from such a tool? In my experience, it boils down to two concerns: Application and Content.</p>
<p>These aren’t perfect definitions, but for the sake of this post:
Application concerns are <strong>how your game handles events</strong>.</p>
<ul><li>When a character walks on an icy pathway, how does their movement change?</li>
<li>When a character is hit with a projectile, how far back do they bounce? The game’s code probably handles implementations of physics behaviors.</li></ul>
<p>On the flip side, Content is <strong>what events are in the game</strong> and <strong>where they are</strong>.</p>
<ul><li>Example: This room has two enemies.</li>
<li>Example: This character says THIS phrase when you talk to them.</li>
<li>Example: Walking into the coffee shop doorway space transfers you inside the coffee shop map.</li></ul>
<p>If we think about content as input configuration, we can extract those instructions and have them piped in from another source.</p>
<p>Let’s consider a dialog text box. Maybe it’s called a <code>Textbox</code> component in the code repo. The application’s code may handle how the text box appears on screen, maybe the animation it plays, the ability to tap or press a button to skip to the end of the text.</p>
<p>Having the content of the actual words baked into a <code>Textbox</code> component code may not scale well. After all, you could potentially have hundreds of text boxes in your game! If you build the component so that the words can be passed in, you are leaving a door open for an editor program to populate the actual words.</p>
<p>This might be everyday programming stuff anyway, but it’s important to keep in mind because some cases are sneaky and pop in all over the place - especially when you are working quickly. Taking the extra effort to consider the data flow could save you many hours of tedious work in the long run.</p>
<h2>How nice does the editor need to be?</h2>
<p>In theory, you’re going to be spending a lot of time working with your editor program. It should have high enough fidelity for you to use the tool and get the job done, but it probably doesn’t need to be the most beautiful app in the world. The editor apps I make usually start completely un-styled… the bare minimum to use the thing… and I tidy them up when the features reach high enough complexity to warrant UX enhancements. Even the finished product has quite a few wires hanging out because very few people use the tool or care about the appearance.</p>
<p>If you’re using a game engine, building your own editor doesn’t mean having to start everything from scratch. These engines often have ways to extend the default engine IDE so you can make custom workflows that are specific to your game. For example, Godot allows you to run custom code with the <code>tool</code> keyword in its default IDE. Unity has similar features, too.</p>
<p>The right tools for you will depend on the game you’re trying to build. Be cognizant of workflow friction and hurdles that come up as you work on your game. Those micro problems and frustrations are where an editor app can really improve your workflow.</p>
<h2>Tour of Editors</h2>
<p>Here’s a clip of the tour we used for Danger Crew. (This embed will start at the relevant timestamp.)</p>
<iframe width="560" height="315" src="https://www.youtube.com/embed/k_elrL6lqLQ?start=478" title="YouTube video player" frameborder="0" allow="accelerometer; autoplay; clipboard-write; encrypted-media; gyroscope; picture-in-picture" allowfullscreen></iframe>
<p><a href="https://youtu.be/k_elrL6lqLQ" rel="nofollow">Watch the full video on YouTube here</a></p>
<p>Okay, I hope your mind is spinning with creative ideas regarding building your own tools to make working on your game easier. If you have any cool internal editing tools to show off, join our <a href="https://discord.gg/umD2GRy" rel="nofollow">Discord Community</a> and tell us about them.</p>]]></content>
      </entry>
    <entry>
        <title>Get "Unstuck" on your Game Dev Project</title>
        <link href="https://coopmode.dev/articles/get-unstuck-4-ways"/>
        <id>https://coopmode.dev/articles/get-unstuck-4-ways/</id>
        <updated>2022-03-20T00:00:00.000Z</updated>
        <published>2022-03-20T00:00:00.000Z</published>
        <content type="html"><![CDATA[<p>Does this sound like you? (It definitely sounds like me!)</p>
<ol><li>New game idea enters your mind</li>
<li>Your imagination goes crazy with the possibilities of what the game could become. Features, stories, art style, etc.</li>
<li>You quickly spin up a New Project in your editor or engine of choice. Maybe even reaching for <em>that new exciting one</em> that you’ve had your eye on.</li>
<li>You’re really productive at first!</li>
<li>A few days go by, the honeymoon starts to wear off a bit. Bugs come up, and you enter the classic “sludge” phase of any long project.</li>
<li>A different idea pops into your head. You decide to pursue that one for a bit, promising yourself that you’ll keep both projects going.</li>
<li>The first project eventually ends up abandoned. The cycle repeats.</li></ol>
<p>If you resonate with any of that, you should know that you’re not alone! We game developers are constantly at risk of getting knocked off track and actually finishing our game projects.</p>
<p>Here are a few productivity tips I’ve discovered over the years of working on my projects. These tips have helped me anchor to my current projects and actually finish them. Some of my games like Danger Crew and Pizza Legends would have never happened without them.</p>
<p>Here they are!</p>
<h2>1: Find an Accountability Partner</h2>
<p>The biggest reason that people abandon gamed projects is the feeling of being alone in the sludge. You have a mountain of work to do. It’s exciting at first, but all the little hurdles, misestimation of effort, and endless graveyard of bugs can be demoralizing.</p>
<p>When you don’t have anybody to share that drowning feeling with, it’s easy to be tempted to switch projects to something brand new. I mean, hey - greenfield projects don’t have any of that baggage! (Until they do…)</p>
<p>Having a partner or two in the fray of a project can help sustain momentum. When you are feeling low, your partner can be there to pick you up and vice versa. It’s exciting to share progress with people when they genuinely care about the outcome.</p>
<p>Even if your accountability partner isn’t working directly on the project, like writing code, making art, editing stories, etc, they can still be a huge help by being present in other aspects of the process. Some examples:</p>
<ol><li>Your partner can play early cuts of the game and give you feedback.</li>
<li>Your partner can do QA testing - try the game like a real player, intentionally trying to break things, and report back with any bugs they find.</li>
<li>Your partner can help you decide what to focus on next. Managing your own creative project is a lot of work on its own - maybe they can help funnel your focus towards the next most important milestone.</li></ol>
<p>In my case, my friend <a href="https://gwlabarre.com/" rel="nofollow">Glenn</a> and I work on games together. We have a call every Tuesday night where we screen share progress and bounce ideas off each other. The meetings are casual and low-pressure, but the objective of showing progress adds a motivational layer of accountability.</p>
<p>If you don’t have anybody around to act as an accountability buddy, feel free to join our <a href="https://discord.gg/umD2GRy" rel="nofollow">Discord</a>! There are people in there who will help give you a boost when you need it.</p>
<h2>2. Set your sights on demo release milestones</h2>
<p>Finishing an entire game is a massive amount of work. You know this already, but I’ll reiterate: there is code to write, art to draw, stories to figure out, audio, music, marketing, argh. The list can go on. You get it - lots of work, never enough time in the day.</p>
<p>It’s tempting to daydream about that glorious day when the whole project is built and ready to be released. Realistically, it’s probably going to take you a while to get there.</p>
<p>Instead of focusing on that final release, shift your focus to releasing your first vertical slice.</p>
<p>A <strong>vertical slice</strong> is a demo of your game that has all the major features in place to make the game feel like what you intend it to be. The core of the game loop needs to be implemented, but it doesn’t need all of the content of the final game. Artwork and UI design can be placeholders if the real assets aren’t ready.</p>
<p>The demo should be at least one playable session that gives players a true idea of what the game is like to play, and the potential of what more could be there. It’s a mini version of your final game.</p>
<p>Throughout the process of working on our first game, Danger Crew, we put out demo versions of the game on communities like CodePen every 8 months or so. The early demos were very simple, just enough to show progress. The final demo had pretty much all of the features of the final version we ended up with, it was just a matter of adding content.</p>
<p>The real win here is shipping some form of a playable game to people. Sitting on unreleased work for too long can create anxiety and cause pressure and self-doubt to build up. Releasing things to the world can be a well-deserved morale boost that will encourage you to keep going.</p>
<h2>3: Know when to Zoom In and Zoom Out</h2>
<p>There’s a spectrum of focus that exists when you’re working on a game. I like to think about it like this:</p>
<p>There’s <strong>zooming in</strong> and <strong>zooming out</strong>. Bear with me here for a silly metaphor… imagine your game is a giant skyscraper and you’re looking at it from a good distance away through a camera lens.</p>
<p>You can <em>zoom out</em> and see the whole building against the skyline. You can answer questions like: What’s the general shape of the building? How many floors? What’s the regional architectural style? Who goes here? What is this place for?</p>
<p>Conversely, you can <em>zoom in</em> and concentrate on specific details. What color is the carpeting? What’s the style of furniture on floor #13? Where are the stairs or elevators that allow you to get around the building?</p>
<p>(Okay, enough with the skyscraper thing. You get the idea.)</p>
<p>Both extremes of zooming are important. If you’re only focusing on high-level areas, like writing the story or character motivations, and never the “feel” of playing the game, like the details of each interaction, it might feel underwhelming to play. Your carefully crafted story may not be delivered with the impact it deserves.</p>
<p>On the flip side, if you’ve been too into the details and not thinking about anything high level, your game might not feel like a whole world… maybe more like a tech demo. Imagine you have a super tight platformer in the works, like Mega Man X or Celeste, but only a demo room. (It’s important to get these games feeling great first, after all). If you find yourself bored or depressed with the project, it may be time to <em>zoom out</em> and give the character more than a demo room to live in. How about a full level? How are you going to apply the features you built to a real scene in the final game?</p>
<p>Another way to say this is the classic phrase “losing the forest for the trees.” Sometimes you need to step back and focus on high-level big picture stuff. Other times, you may just need to sit down, throw headphones on, and hone in on tiny minutia details of one single interaction. Make it feel perfect.</p>
<p><em>Here is the point.</em></p>
<p>If you’re feeling stuck, figure out which zoom mode you have been operating in… then <strong>do the opposite</strong>. </p>
<p>Changing your focus may be what you need to get yourself a fresh boost of inspiration and motivation. Sick of tweaking the demo physics? Write a story! The game doesn’t feel exciting to play? Maybe spend a whole afternoon on making one new animation feel just right. It may be the spark you need to keep going and feel excited about the project again.</p>
<h2>4: Capture ideas for your project every single day</h2>
<p>Finally, this last one may sound too simple, but it’s probably the most important one.</p>
<p>Ideally, you can be working on the game every single day, but let’s be real - you’re a busy person with responsibilities and commitments. You may have limited time in the week to actually work on your game project.</p>
<p>On days where you don’t have time to actually write code, do art, music, whatever, try to <strong>write down</strong> at least one thought or idea for your project.</p>
<p>Anything as big as “what about a whole new ice skating mechanic?” or small details like ideas phrases of dialogue. Even if it’s a whacky idea that isn’t practical, recording the thought keeps your mind engaged and interested in the possibilities of the project.</p>
<p>I personally use a combination of a physical notebook and text files in Dropbox. Digital products like Evernote and Notion are really effective too and have multi-device support so you can capture ideas on your phone.</p>
<p>Capturing ideas every day keeps your mind engaged on the project and helps fill potential gaps where other project ideas might give you shiny object syndrome.</p>
<p><strong>But Watch out for Burnout</strong></p>
<p>Be careful and listen to yourself when it comes to burnout. One of the worst things you could do is overwork yourself and then lose all interest in creating anything. </p>
<p>If you truly need a break from the project, take a break! I personally like to recharge by playing games, going running, and surrounding myself with other people’s creative work to help get me inspired again.</p>
<hr>
<p>Finishing a game is a TON of work, but I hope these tips will help you out in the journey. If you have your own tips for getting unstuck, feel free to email us or tell us about them in <a href="https://discord.gg/umD2GRy" rel="nofollow">Discord</a>.</p>
<p>If you prefer video content, check out the <a href="https://youtu.be/IMSCE_Z2dps" target="_blank">video version of this post</a> on YouTube.</p>]]></content>
      </entry>
    <entry>
        <title>Repost: Danger Crew packaged with Electron</title>
        <link href="https://coopmode.dev/articles/dangercrew-on-steam"/>
        <id>https://coopmode.dev/articles/dangercrew-on-steam/</id>
        <updated>2022-01-02T00:00:00.000Z</updated>
        <published>2022-01-02T00:00:00.000Z</published>
        <content type="html"><![CDATA[<p>Let&#39;s break down the technical stack of Danger Crew. We built this game with React, then wrapped it with Electron to package for Steam.</p>
<p><img class="dangercrew__hero-image" src="https://s3-us-west-2.amazonaws.com/s.cdpn.io/21542/Screenshot%201.png" alt="Danger Crew"></p>
<p><strong>Danger Crew is finally DONE and released on Steam today!</strong> Danger Crew is a top down RPG game written in HTML, CSS, and JavaScript. It&#39;s a story in <code>&lt;div&gt;</code>s about people who write <code>&lt;div&gt;</code>s! I&#39;ve shared a few posts about making Danger Crew before... it even started as a demo on CodePen!</p>
<div class="dangercrew__cta-container"><a href="https://store.steampowered.com/app/1064690/Danger_Crew" class="dangercrew__cta">See Danger Crew on Steam
</a>
<p class="dangercrew__cta-container-caption">Watch the trailer to get a feel for the game!</p></div>
<p>This particular question came up on Reddit&#39;s r/reactjs:</p>
<p><img class="dangercrew__reddit-post" alt="Web Devs can publish games on Steam now? My dream is finally realizable." src="https://s3-us-west-2.amazonaws.com/s.cdpn.io/21542/RedditScreenshot.png"></p>
<p>(Thanks to <a href="https://twitter.com/swyx">Shawn</a> for posting <a href="https://www.reddit.com/r/reactjs/comments/bgd0gb/danger_crew_an_rpg_built_with_react_over_3_years/">the original thread</a>!)</p>
<p>Yes - It&#39;s 100% true. Web devs can absolutely publish games to Steam.</p>
<p>This post is a quick tour of my process for bundling up an HTML project as a standalone app for both Windows and Mac. The app can then be distributed on a platform of your choice, such as Steam, using the Electron framework. We&#39;re going to go through a brief introduction to Electron, workflow with bringing a static site over to an Electron environment, and some random gotchas I found along the way.</p>
<p>Before we get started, I&#39;m going to be saying &quot;Steam&quot; a lot. This could be replaced with whatever platform you want to target. The idea here is to compile your browser centered code into a native application for whatever purposes you need.</p>
<p>I hope you leave this post with some newly sparked empowerment knowing that your front end skills can be used in places beyond web browsers. If you already knew all this stuff - I hope you take action to make something and tell us about it!</p>
<h3>Starting with a static site</h3>
<p>Here is my situation: I have created something in all HTML, CSS, and JavaScript. There’s no backend server to bake data from a database into the page. Any content specific to a particular user is fetched through AJAX calls. The static nature of my project keeps it nice and portable.</p>
<p>To be a little more specific, my <em>specific</em> project uses Create React App out of the box - no ejecting or fancy customization. I develop using CRA’s <code>npm start</code> and cut my production builds using <code>npm build</code>. When building for production, CRA generates a fresh <code>build</code> directory. I move the contents of that directory to my server and kaboom 💥 - my project is live on the web. The content of this post has no dependency on Create React App… I just wanted to call out that the thoughts here are valid for any kind of project where the final output is static files.</p>
<h3>A Mega Simple Introduction to Electron</h3>
<p><a href="https://electronjs.org/">https://electronjs.org/</a></p>
<p>From their website: &quot;Electron is a framework for creating native applications with web technologies like JavaScript, HTML, and CSS. It takes care of the hard parts so you can focus on the core of your application.&quot; Some popular examples of Electron apps, according to Electron&#39;s website, are Slack, VS Code, Skype, and Discord.</p>
<p>Me to you, developer to developer, working with Electron feels just like running any other development Terminal process on your machine. You <code>cd</code> into your Electron project, run the <code>npm start</code> command to launch a local instance of your work, then eventually run a build command to compile native production versions of your application. (More details on building later in the post!)</p>
<p>Your application will launch in its own private version of Chromium. Think Google Chrome but without all the personalized user browser features and extra stuff. You even have the same Dev Tools available to you! You&#39;ll feel right at home as a front end developer.</p>
<p>To get started, clone this repo to your machine:
<a href="https://github.com/electron/electron-quick-start">https://github.com/electron/electron-quick-start</a></p>
<p>Run <code>npm start</code> to launch the app locally, then make any change you want to the included <code>index.html</code> file. On reload, you&#39;ll see your changes appear in the app. Go crazy with all the styling and scripting you want - it will work as you expect! </p>
<p>But wait, there&#39;s more! Electron works with Node.js under the hood. In addition to client side scripts, you also have the ability to write and run what seems like backend code. For example, my app utilizes a few Node functions to read and write JSON files to the user&#39;s computer. These functions power the &quot;Save Game&quot; and &quot;Continue Game&quot; features where player progress can be stored locally with no requirement for a database or stable Internet connection.</p>
<p>It&#39;s front end code + the power of Node all packaged together. The possibilities are endless! This post isn&#39;t really a full Electron tutorial, but a mere prompt for you to dive in and explore what Electron can provide for your project.</p>
<p>Workflow for integrating your browser-based project in an Electron environment</p>
<p>If you intend to build a project from the ground up using Electron, you can probably skip this part of the post. Part of the promise here was &quot;how to package your [existing] web project as an app&quot;, so now we have some gotchas for the projects that are browser first, native app second.</p>
<p>For my team&#39;s purposes, we like keeping our web version completely independent from our Electron builds. We can always run the app in a webpage/browser as originally intended. This way, we can quickly publish changes to our staging site for rapid development and QA.</p>
<p>We have two repos:</p>
<ol><li><strong>The web project.</strong> This is the code that existed before Electron came into the picture. It&#39;s the game created with Create React App in my case, but again, the important part is that it&#39;s whatever runs in the normal browser for you.</li>
<li><strong>The Electron project</strong>. This is a separate project on my machine bootstrapped from <code>electron-quick-start</code> above. For my purposes, I copy outputted production files from the web project <em>into</em> this project. I don&#39;t mind copying the files manually because it&#39;s as simply as copy/pasting a directory every few days, but this could totally be automated if you wanted. After copying the files over, we export a final build that goes to Steam.</li></ol>
<p><strong>Here&#39;s the catch with bundling your existing web project with Electron.</strong> Electron is a Node environment. It assumes your project is built with CommonJS. Maybe you&#39;re already doing that in development, especially if using a modern tooling chain like Create React App, but we want to provide our browser-friendly production build files to Electron - not development source files. Our production webpage has references to assets like this: </p>
<div class="box"><pre class="lang-xml has-code">  <code class="html cm-s-default" data-lang="xml"><span class="cm-comment">&lt;!-- you know, the good &#39;ol way! --&gt;</span>
<span class="cm-tag cm-bracket">&lt;</span><span class="cm-tag">link</span> <span class="cm-attribute">rel</span>=<span class="cm-string">&quot;stylesheet&quot;</span> <span class="cm-attribute">type</span>=<span class="cm-string">&quot;text/css&quot;</span> <span class="cm-attribute">href</span>=<span class="cm-string">&quot;/css/my.production.stylesheet.css&quot;</span><span class="cm-tag cm-bracket">&gt;</span>
<span class="cm-tag cm-bracket">&lt;</span><span class="cm-tag">script</span> <span class="cm-attribute">src</span>=<span class="cm-string">&quot;/js/my.production.bundle.min.js&quot;</span><span class="cm-tag cm-bracket">&gt;</span><span class="cm-tag cm-bracket">&lt;/</span><span class="cm-tag">script</span><span class="cm-tag cm-bracket">&gt;</span>
</code>
</pre></div>
<p>When initially viewing your project&#39;s HTML through Electron&#39;s development environment, you might see an unstyled page with a bunch of 404 network errors. Electron is not set up to resolve paths to relative assets like the public server of our static files. We&#39;re making clever use of Electron here by porting over an existing project, so we need to help it out. Here&#39;s a way to fix the path resolution. Make these edits to the <code>main.js</code> file that comes with electron-quick-start:</p>
<pre class="language-js"><!-- HTML_TAG_START --><code class="language-js"><span class="token comment">/* Augmentations to the default main.js file that comes with electron-quick-start */</span>

<span class="token comment">//The top section of &#96;requires&#96; will already be there. Make sure the following requires are present!</span>
<span class="token keyword">const</span> <span class="token punctuation">&#123;</span> app<span class="token punctuation">,</span> protocol <span class="token punctuation">&#125;</span> <span class="token operator">=</span> <span class="token function">require</span><span class="token punctuation">(</span><span class="token string">'electron'</span><span class="token punctuation">)</span><span class="token punctuation">;</span>
<span class="token keyword">const</span> url <span class="token operator">=</span> <span class="token function">require</span><span class="token punctuation">(</span><span class="token string">'url'</span><span class="token punctuation">)</span><span class="token punctuation">;</span>

<span class="token comment">//This is the "out of the box" loadFile line:</span>
<span class="token comment">//mainWindow.loadFile('index.html')</span>

<span class="token comment">//Use this instead - it's the first step in helping Electron find your assets</span>
mainWindow<span class="token punctuation">.</span><span class="token function">loadURL</span><span class="token punctuation">(</span>
	url<span class="token punctuation">.</span><span class="token function">format</span><span class="token punctuation">(</span><span class="token punctuation">&#123;</span>
		<span class="token literal-property property">pathname</span><span class="token operator">:</span> <span class="token string">'index.html'</span><span class="token punctuation">,</span>
		<span class="token literal-property property">protocol</span><span class="token operator">:</span> <span class="token string">'file'</span><span class="token punctuation">,</span>
		<span class="token literal-property property">slashes</span><span class="token operator">:</span> <span class="token boolean">true</span>
	<span class="token punctuation">&#125;</span><span class="token punctuation">)</span>
<span class="token punctuation">)</span><span class="token punctuation">;</span>

app<span class="token punctuation">.</span><span class="token function">on</span><span class="token punctuation">(</span><span class="token string">'ready'</span><span class="token punctuation">,</span> <span class="token punctuation">(</span><span class="token punctuation">)</span> <span class="token operator">=></span> <span class="token punctuation">&#123;</span>
	<span class="token comment">//This event should already exist in main.js</span>
	<span class="token comment">//Add this block! It's the second step in helping Electron find your assets</span>
	protocol<span class="token punctuation">.</span><span class="token function">interceptFileProtocol</span><span class="token punctuation">(</span>
		<span class="token string">'file'</span><span class="token punctuation">,</span>
		<span class="token punctuation">(</span><span class="token parameter">request<span class="token punctuation">,</span> callback</span><span class="token punctuation">)</span> <span class="token operator">=></span> <span class="token punctuation">&#123;</span>
			<span class="token keyword">const</span> url <span class="token operator">=</span> request<span class="token punctuation">.</span>url<span class="token punctuation">.</span><span class="token function">substr</span><span class="token punctuation">(</span><span class="token number">7</span><span class="token punctuation">)</span><span class="token punctuation">;</span>
			<span class="token function">callback</span><span class="token punctuation">(</span><span class="token punctuation">&#123;</span> <span class="token literal-property property">path</span><span class="token operator">:</span> path<span class="token punctuation">.</span><span class="token function">normalize</span><span class="token punctuation">(</span><span class="token template-string"><span class="token template-punctuation string">&#96;</span><span class="token interpolation"><span class="token interpolation-punctuation punctuation">$&#123;</span>__dirname<span class="token interpolation-punctuation punctuation">&#125;</span></span><span class="token string">/</span><span class="token interpolation"><span class="token interpolation-punctuation punctuation">$&#123;</span>url<span class="token interpolation-punctuation punctuation">&#125;</span></span><span class="token template-punctuation string">&#96;</span></span><span class="token punctuation">)</span> <span class="token punctuation">&#125;</span><span class="token punctuation">)</span><span class="token punctuation">;</span>
		<span class="token punctuation">&#125;</span><span class="token punctuation">,</span>
		<span class="token punctuation">(</span><span class="token parameter">err</span><span class="token punctuation">)</span> <span class="token operator">=></span> <span class="token punctuation">&#123;</span>
			<span class="token keyword">if</span> <span class="token punctuation">(</span>err<span class="token punctuation">)</span> console<span class="token punctuation">.</span><span class="token function">error</span><span class="token punctuation">(</span><span class="token string">'Failed to register protocol'</span><span class="token punctuation">)</span><span class="token punctuation">;</span>
		<span class="token punctuation">&#125;</span>
	<span class="token punctuation">)</span><span class="token punctuation">;</span>
<span class="token punctuation">&#125;</span><span class="token punctuation">)</span><span class="token punctuation">;</span></code><!-- HTML_TAG_END --></pre>
<p>After making these changes, you should see your assets loading correctly in the Electron environment! No need to change your existing code to use CommonJS!</p>
<p><strong>IMPORTANT DISCLAIMER</strong> - making this change comes with some baggage. You may be opting out of some of Electron&#39;s capabilities by configuring this behavior. Research and experimentation will be required to figure out if it&#39;s a deal breaker for you. If so, you may be in the camp of combining your web project with your Electron project. For our project, the changes outlined above have been totally fine.</p>
<h3>Exporting the final native apps</h3>
<p>Okay, nice work! You&#39;ve done your development and are ready to export a final application that real users will download and run on their computers. The Electron community has a few options for exporting. I&#39;ve been using one called Electron Builder:
<a href="https://github.com/electron-userland/electron-builder">https://github.com/electron-userland/electron-builder</a></p>
<p>Install Electron Builder in your project by following the instructions listed on the GitHub page above. After installation, you will be able to run a command to create a packaged version of your app:</p>
<div class="box"><pre class="lang-shell has-code">  <code class="bash cm-s-default" data-lang="shell"><span class="cm-comment"># Run this from the root of your Electron project after installing `electron-builder`</span>
electron-builder
</code>
</pre></div>
<p>To my understanding, this command will default to whatever platform you&#39;re on. I&#39;m on a Mac, so this command will create a Mac OSX [MyProjectName].app file in a new <code>/dist</code> directory of my Electron project. I run <code>electron-builder --win</code> while on my Mac to create a Windows version. I bet the reverse is true for creating a Mac version while on a Windows machine.</p>
<p>At this point, the contents of <code>dist</code> are all you need to distribute your app! Open the exported files and you will have native versions of your web project running on your machine! 🎉 These are the files that eventually get distributed to Steam, or the platform of your choice.</p>
<h3>Bonus: Rapid fire things you should know about Steam</h3>
<p>The post is over, but I thought I&#39;d leave you with some random knowledge I acquired from going through the process of distributing <a href="https://store.steampowered.com/app/1064690/Danger_Crew/">Danger Crew on Steam</a>.</p>
<ul><li><p>Steam is not just for games. People release software on Steam, too. My favorite is <a href="https://store.steampowered.com/app/431730/Aseprite/">Aesprite</a>. Anything [appropriate] you built for the web is also valid for Steam!</p></li>
<li><p>Uploading your game to Steam involves installing the Steam SDK to your computer. You copy your builds (same content as the <code>dist</code> folder above) into a specified location and run Valve&#39;s build script. Most of the documentation is for Windows, but the SDK works fine on Mac, too. <a href="https://partner.steamgames.com/doc/sdk">Read the documentation</a>. This <a href="https://www.youtube.com/watch?v=SoNH-v6aU9Q">screencast</a> helped me wrap my head around the process.</p></li>
<li><p>Steam is really just a launcher that opens and updates software on your computer. If you upload a new version of your app, any user who has downloaded your app through Steam will receive an automatic updates (assuming the user has an Internet connection and has not turned off the updating feature). You don&#39;t have to write any extra code to make Steam do its thing.</p></li>
<li><p><strong>However</strong>, Steam does inject some code to make features like Steam Overlay work. (That&#39;s where a player presses Shift + Tab to access Steam Chat and other widgets while in game) This <strong>does not</strong> work out of the box with Electron. I&#39;m still trying to figure out why.</p></li>
<li><p>Controller support just works! It&#39;s the craziest feeling - you plug in a Steam Controller, Xbox Controller, or PS4 Controller, configure the bindings (like, the &quot;A&quot; button on Xbox Controller means &quot;press the spacebar&quot; key) and your game/app is instantly controller compatible. You do not need to write custom code to make controller bindings work.</p></li></ul>
<p>If you want to make games + you know HTML, CSS, and JavaScript... <strong>there is nothing stopping you</strong>.</p>
<p>If you prefer video content, I recorded a presentation about the project <a href="https://youtu.be/nHaiLWUaWWw" rel="nofollow">here on YouTube</a>.</p>]]></content>
      </entry>
    <entry>
        <title>Repost: Danger Crew's Multiplayer Battle Prototype</title>
        <link href="https://coopmode.dev/articles/dangercrew-battle-demo"/>
        <id>https://coopmode.dev/articles/dangercrew-battle-demo/</id>
        <updated>2022-01-01T00:00:00.000Z</updated>
        <published>2022-01-01T00:00:00.000Z</published>
        <content type="html"><![CDATA[<div class="post-legacy-callout"><p><strong>This is a legacy post!</strong>.</p>
    <p>The post was previously published on CodePen&#39;s blogging platform but has been moved to this website. The information and journey is still relevant!</p></div>
<p><strong>The Danger Crew Battle Demo</strong> is live! I’ve been working on it for a few months and am super excited to share some behind the scenes details of the project.</p>
<p>You can play it here: <a href="http://battle.thedangercrew.com">battle.thedangercrew.com</a></p>
<strong>2022 Update</strong>: It&#39;s not really playable on this domain anymore, but we&#39;ll fix it if enough people ask. (It will take a good bit of work, and I&#39;m not sure how many people are actually interested.) Use the Contact Us page!
<img src="https://s3-us-west-2.amazonaws.com/s.cdpn.io/21542/Screen%20Shot%202017-09-20%20at%206.02.13%20PM.png" alt="The Danger Crew Battle Demo">
<p>The quick pitch: The Danger Crew is an adventure RPG in the browser. It’s about being a developer and getting in silly hack battles with other developers.</p>
<p>The Danger Crew Battle Demo is an excerpt of one key aspect of The Danger Crew: the battles! Players spend the majority of time in these battle sequences, so it’s important that they are engaging, exciting, and dynamic. The old system was pretty solid, but it had some fundamental limitations for providing enough variety for a long form game.</p>
<p>I had big changes in mind, so I set out to create a stand-alone demo just for battling. This demo helps gather feedback on a very specific element of the game before rolling it into the rest of the walking/talking adventure.</p>
<h3>Adding more depth to the Battles</h3>
<p>The most obvious change here is that battles are no longer one developer vs one developer. Battles are now team based - a team of 1 to 3 people vs another team of 1 to 3 people. We’re finally putting the “Crew” in Danger Crew. One on one battling worked great for the first chapter of the game, but it was evident that we needed more variety for chapters two, three, and beyond. Crews enable the player to customize multiple combatants and approach challenges with more creativity.</p>
<p>One new medium of creativity is the Class system. A Class is a category that describes a character’s function on a team. For example, the <em>Hackalete</em> class is designed to deal lots of damage really quickly while the <em>Scrum Master</em> class is in charge of keeping team defense and productivity high. They have fun tech names, too.</p>
<p><img src="https://s3-us-west-2.amazonaws.com/s.cdpn.io/21542/Screen%20Shot%20-%20edit%20character.png" alt="Editing a Character in The Danger Crew"></p>
<p>Classes complement each other. Teamwork is necessary to win. These specialties are made possible by expanding the battles to be team vs team, where a solo <em>Scrum Master</em> would struggle head to head against an enemy <em>Hackalete</em>, but a team combination of <em>Hackalete</em> and <em>Scrum Master</em> are a synergistic threat. Classes can stack, too. There’s nothing quite as stressful as facing off against 3 <em>Quality Assurance</em> engineers at once.</p>
<p>One of my favorite parts - Each Class has a Super Charge move that relates to its role. These explosive moves are intended to cause turning points in battle - like a healer reviving all dead teammates or a disrupter setting all enemy laptops on fire. Tensions get high after a few turns when you know the opponent team is ready to unleash their Supers.</p>
<p>All of these new elements allow the game to put the player in many different situations.</p>
<h3>Multiplayer</h3>
<p>It’s gotta be the most common question I get about the game. It seems like an obvious add: it fits well with turn based style and is right at home in a web game.</p>
<p>I’ve always been hesitant to add multiplayer for two reasons:</p>
<ol><li><p>I wanted to keep the game’s focus really clear. The classic RPGs that inspire The Danger Crew [mostly] didn’t have multiplayer. They were focused on the single player narrative. I wanted to follow in those footsteps and never rely on the presence of multiplayer.</p></li>
<li><p>Online multiplayer adds technical overhead. I’d have to think about servers, real time events, security, etc.</p></li></ol>
<p>The exact scope of multiplayer is an open question, too. It could be a big extensive open world MMORPG where you see other players walking around or as simple as a single one-vs-one battle game. I’m still unsure if and how multiplayer will fit into the full game, but this particular battle-only demo offered an easy opportunity to try it out.</p>
<p>The demo has two multiplayer modes: Versus and Rally. Versus is one human vs one human: each player controls a team of combatants. It’s just like solo play where the player controls the entire friendly team, but the enemy team is controlled by another human. Rally lets up to 6 players join a game room. Each person controls one combatant. The room’s creator can also add bots to the match. This mode is nuts! Having two modes helps answer the question: is it more fun to control a whole team? or is it more fun to control one person as co-op with other humans?</p>
<p>Like I mentioned, the reality of servers and backend stuff had me hesitant. I enjoy backend work, but I really want to only focus on gameplay and storytelling in this project. I also don’t want to stress about downtime or scaling. Firebase to the rescue!</p>
<h3>So how does it work?</h3>
<p>(This part assumes a tiny bit of knowledge about Firebase, but don’t worry if you’re not familiar.)</p>
<p>The Firebase database has a top level node called <code>rooms</code>. Each multiplayer game session is a node inside <code>rooms</code>. Two to six players connect to a single game room, each person having a key in a “connections” node of the room. We use Firebase’s anonymous login to make sure users are authenticated before having access to write data to a room.</p>
<p>The state of a battle is stored as an object in a Redux store. When a player submits an event, they calculate changes to the Redux state locally then send up 1) the updated state and 2) a description of what happened. For example, if I use “Scope Bomb” against Betty, my browser will calculate how much damage I did to Betty and subtract from her total HP. I’ll send up an updated object with Betty’s new HP value as well as “Drew used Scope Bomb!” readable text messages. I call these rollouts. I talk more about them in a previous post (link below). The other clients will see my message, display the rollout, and update their local Redux stores.</p>
<p>One client is designated as the “master” who reads the state and sends the updates of which player gets to choose next. Once all players have seen the “Drew used Scope Bomb!” message and are loaded up with the updated state in their browsers, the master enables the next person in line to make their move. The cycle repeats from there until all combatants on one side are out of HP.</p>
<h3>What went well?</h3>
<p>The turn cycle system fundamentally supports multiple players. It works the same way online as it does offline. In single player, all enemies are combatants with <code>isBot: true</code>. This flag means that the combatant goes through the same turn process, but the browser makes a decision for them right away so it feels automatic. In multiplayer, players marked as <code>isBot:false</code> manually fill out the attack menu before the cycle proceeds.</p>
<h3>What was tricky?</h3>
<p>This system is all client to client, so source of truth of the battle state is being shared and passed around. I’d prefer to do calculation of next state on a server so nobody can intercept and cheat on the client. Also, don’t store arrays in Firebase. You’re going to have a bad time. :D (I initially reached for arrays for item inventory, etc) We use the same battle system for both local and multiplayer, so we’re stuck with Firebase’s opinions on arrays even when not using Firebase. You also have to think through transferring ownership of the “master” role if the “master” client disconnects.</p>
<p>I’m still unsure how multiplayer fits into the future of The Danger Crew, but I think creating this pilot was worth the effort.</p>
<p>These character sprite assets are created with Aesprite then later converted to SVGs.</p>
<h3>More content</h3>
<p>I made a video walkthrough of the Battle Demo here: <a href="https://www.youtube.com/watch?v=RX86N0834pU" rel="nofollow">Battle Demo YouTube Walkthrough</a></p>
<p>CodePen Radio podcast episode: <a href="https://blog.codepen.io/2017/06/27/136-drew-conley/" rel="nofollow">CodePen Radio episode</a></p>
<p>Thanks for reading! I can’t wait to report back soon with this battle system incorporated into the full game.</p>]]></content>
      </entry>
  </feed>